The Myvatn region in Northeast Iceland is a geological marvel, a landscape sculpted by millennia of volcanic activity and glacial retreat. Often described as a microcosm of Iceland's diverse natural wonders, it offers an unparalleled photographic playground for enthusiasts and professionals alike. From the otherworldly lava formations of Dimmuborgir to the steaming, colorful geothermal fields of Hverir, and the serene beauty of Lake Myvatn itself, every turn presents a unique opportunity to capture breathtaking images.
At Iceland Photo Map, we understand the allure of this extraordinary destination. This comprehensive guide is designed to be your essential companion, diving deep into the best Myvatn photography spots, offering expert tips, and ensuring you're fully prepared to immortalize its magic. Whether you're chasing the ethereal glow of the Northern Lights or basking in the endless daylight of the Midnight Sun, Myvatn promises an unforgettable visual journey. Let's embark on your Myvatn photography adventure.
Introduction: Welcome to the Myvatn Region
Nestled in the active volcanic zone of North Iceland, Lake Myvatn and its surrounding area are a testament to the raw power of nature. Formed by massive eruptions approximately 2,300 years ago, as documented by Visit Myvatn, the region boasts an incredibly diverse geological and ecological landscape. From the dramatic pseudocraters that dot the lake's shores to the bubbling mud pots and steaming fumaroles of Námafjall, Myvatn is a living laboratory of geothermal and volcanic processes. Its unique ecosystem supports an astonishing array of birdlife, making it a globally recognized haven for ornithologists and wildlife photographers.
For photographers, Myvatn is more than just a collection of scenic vistas; it's a dynamic canvas that shifts with the light, weather, and seasons. The stark contrasts between dark lava fields, vibrant geothermal colors, and the reflective waters of the lake create endless compositional possibilities. It's a place where you can capture the grandeur of vast landscapes, the intricate details of geological formations, and the delicate beauty of its natural inhabitants all within a relatively compact area.
This guide will serve as your blueprint for navigating the photographic treasures of Myvatn. We'll cover the most iconic Myvatn photography spots, delve into techniques for mastering Iceland's challenging light, recommend essential gear, and provide crucial advice on responsible and safe photography. Our aim is to equip you with the knowledge and confidence to not just visit, but truly capture the essence of this extraordinary Icelandic wonder.
The Diverse Landscape of Myvatn: A Photographer's Dream
The Myvatn region is a geological mosaic, offering an astonishing variety of landscapes within a relatively small area. This diversity is precisely what makes it one of Iceland's premier Myvatn photography spots. Here, you'll find everything from explosive volcanic craters like Hverfjall, vast and intricate lava fields such as Dimmuborgir, and vibrant geothermal areas like Hverir, to the tranquil, bird-rich waters of Lake Myvatn itself, adorned with its distinctive pseudocraters. Each element presents its own photographic challenges and rewards.
Understanding the importance of light and weather is paramount for optimal Myvatn photography. Iceland's weather is famously fickle, often cycling through sun, rain, and even snow within an hour. This unpredictability, however, can be a photographer's greatest asset, creating dramatic skies, ethereal mist, and ever-changing light conditions. Embrace the dynamic nature; a sudden shower can enhance the colors of a geothermal area, while clearing storm clouds can lead to spectacular light rays. often be ready to adapt and protect your gear.
The best seasons for different photographic opportunities in Myvatn vary significantly:
- Summer (June-August): Characterized by the magical midnight sun, offering nearly 24 hours of usable light. This extended golden and blue hour provides soft, directional light perfect for landscapes, minimizing harsh shadows. It's ideal for exploring all the Lake Myvatn photo locations at your leisure.
- Autumn (September-October): Brings a spectacular palette of reds, oranges, and yellows to the vegetation, particularly around the lake and lava fields. The days shorten, increasing the chances of witnessing the aurora borealis, especially as nights grow darker.
- Winter (November-March): Transforms Myvatn into a stark, frozen wonderland. Snow-dusted landscapes, frozen waterfalls (if applicable in the region), and dramatic low light create a moody atmosphere. This is prime season for aurora borealis photography, with long, dark nights. However, accessibility can be challenging due to snow and ice.
- Spring (April-May): Sees the return of migratory birds to the lake, offering excellent wildlife photography opportunities. The landscape begins to thaw and green, providing a fresh perspective. Aurora chances decrease as days lengthen.
Regardless of the season, flexibility and patience are key. Always check local weather forecasts and aurora predictions (e.g., from the Icelandic Met Office) to plan your shoots effectively.
Iconic Myvatn Photography Spots: Dimmuborgir and Höfði
When planning your trip to the Myvatn region, two Myvatn photography spots consistently rank high on every photographer's list: Dimmuborgir and Höfði. Each offers a distinct experience, challenging you to adapt your compositional approach.
Dimmuborgir (Dark Castles) Photography
Dimmuborgir is a truly otherworldly landscape, a vast field of unusually shaped lava formations that rise dramatically from the earth, resembling ancient, crumbling castles or fantastical beasts. These "Dark Castles" were formed approximately 2,000 years ago when a lava flow covered a lake, causing steam explosions that created these unique pillars and arches, a geological process part of the region's broader volcanic history (Visit Myvatn). The sheer scale and intricate details of the formations make Dimmuborgir photography a fascinating endeavor.
- Composing Shots: Focus on isolating individual formations or creating leading lines with the numerous paths that wind through the area. Look for natural frames within arches or gaps in the lava. Incorporate the sparse vegetation, particularly in autumn when the colors can add a vibrant contrast to the dark rock.
- Capturing Scale: The formations are massive. To convey their true scale, include a human element (a distant hiker on a path) or use a wide-angle lens to emphasize their towering presence against the sky. Experiment with low angles to make the structures appear even more imposing.
- Conveying Atmosphere: The "dark castle" atmosphere is best captured in soft, directional light. Early morning or late afternoon golden hour light will create dramatic shadows and highlight the textures of the lava, adding depth and mood. Overcast days can also work well, providing diffused light that enhances detail without harsh contrasts. Consider black and white photography here to emphasize the stark forms and textures.
- Best Times: Sunrise or sunset are ideal for the reasons mentioned above. During midday, the light can be harsh, flattening the forms, but it can still be a good time to explore and scout compositions. In winter, fresh snow clinging to the lava creates a magical, almost fairytale-like scene.
Höfði Photography
Höfði is a small, privately owned nature park on the eastern shore of Lake Myvatn, famous for its unique lava pillars (lakeside Dimmuborgir formations) that rise directly out of the lake's calm waters. These pillars, or "gígjar," are remnants of volcanic eruptions, creating a serene and picturesque scene ideal for reflective compositions.
- Strategies for Lava Pillars: The key to successful Höfði photography is utilizing the lake's surface. Look for moments of calm water to capture perfect reflections of the pillars and the sky. A polarizing filter can help reduce glare on the water, enhancing reflections and saturating colors.
- Reflections and Foreground Interest: Frame your shots to include both the pillars and their reflections. Use the gentle curves of the shoreline or interesting rocks in the foreground to add depth and lead the viewer's eye towards the main subjects. Wide-angle lenses are excellent here to encompass the expansive lake and sky.
- Creating Serene Compositions: The atmosphere at Höfði is often tranquil. Long exposure photography can smooth out any ripples on the water, turning the lake into a mirror-like surface and enhancing the sense of calm. A sturdy tripod is essential for this technique. Experiment with different perspectives – from the shore, looking out, or from slightly elevated points within the park.
- Best Times: Golden hour (sunrise or sunset) provides warm, soft light that can illuminate the pillars beautifully and create stunning colors in the sky and on the water. Overcast days can also work well, offering diffused light that brings out the subtle textures of the lava and creates a peaceful, muted palette.
Both Dimmuborgir and Höfði require a thoughtful approach to light and composition. Take your time, explore the different angles, and let the unique geology guide your creative vision.
Geothermal and Cave Wonders: Hverir and Grjótagjá Photography
Beyond the lake and lava fields, Myvatn offers captivating geothermal landscapes and hidden cave wonders that present their own distinct photographic opportunities and challenges. These sites demand careful attention to safety and ethical considerations.
Hverir (Námafjall Geothermal Area) Photography
Hverir, located at the base of Námafjall mountain, is a dramatic and intensely active geothermal field that feels like stepping onto another planet. The landscape is a vibrant tapestry of reds, oranges, and yellows, stained by mineral deposits, punctuated by vigorously bubbling mud pots, and shrouded in the acrid steam of fumaroles. Hverir photography is about capturing this raw, dynamic energy and the striking palette of colors.
- Capturing Vibrant Colors: The mineral-rich earth creates an incredible spectrum. Use a polarizing filter to reduce glare and saturate these colors, especially after rainfall. Shoot when the sun is lower in the sky to enhance the contrast and texture of the ground.
- Steaming Vents and Bubbling Mud Pots: These are the heart of Hverir's activity. For steam, try backlighting to create an ethereal glow, or use a faster shutter speed to freeze individual plumes. For mud pots, a medium telephoto lens can help isolate the bubbling action. Be patient; the patterns and eruptions are constantly changing.
- Emphasizing Scale: While focusing on details is rewarding, don't forget the broader landscape. A wide-angle lens can capture the vastness of the field with Námafjall as a backdrop, or include distant figures to provide a sense of scale.
- Safety Precautions and Ethical Photography: This is paramount. The ground can be unstable, and temperatures are extremely high. often stay strictly on marked paths. The steam contains sulfur, which can be irritating, especially in strong winds. Be mindful of the fumes and avoid prolonged exposure. Respect the environment; do not touch anything, and leave no trace. This is a fragile and potentially dangerous environment.
Grjótagjá Cave Photography
Grjótagjá is a small, partially hidden lava cave known for its stunning geothermal spring of intensely blue water. Once a popular bathing spot, the water temperature has fluctuated since the eruptions of 1975-1984, making it too hot for bathing, as noted by Visit Myvatn. Its fame grew after being featured in "Game of Thrones." Grjótagjá photography presents unique low-light challenges.
- Challenges and Solutions for Low-Light: The cave is naturally dark, with light filtering in only from the entrance and cracks in the ceiling.
- Tripod: Absolutely essential for long exposures to capture detail without excessive noise.
- Wide Aperture Lens: A lens with f/2.8 or wider will gather more light.
- High ISO: Be prepared to push your ISO to 1600, 3200, or even higher, depending on your camera's low-light performance.
- Manual Focus: Autofocus can struggle in such dark conditions. Use live view to manually focus on a bright point or pre-focus before entering.
- Light Painting (Discreetly): If allowed and done respectfully (without disturbing others), a small flashlight can be used to subtly "paint" light onto specific rock formations or the water during a long exposure. However, be extremely cautious not to overdo it or shine lights in other visitors' eyes.
- Incorporating Context: Frame the entrance to show the cave's natural setting, or focus on the unique rock formations and the vibrant blue of the water. The cave's historical and cultural significance (as a former bathing spot and filming location) can be subtly hinted at through your compositions, perhaps by focusing on the intimate, secluded feel of the space. Be aware that the cave can be very popular; patience is key to getting clear shots without crowds.
Both Hverir and Grjótagjá offer incredible opportunities for unique photographs, but often prioritize safety and respect for these delicate natural wonders.
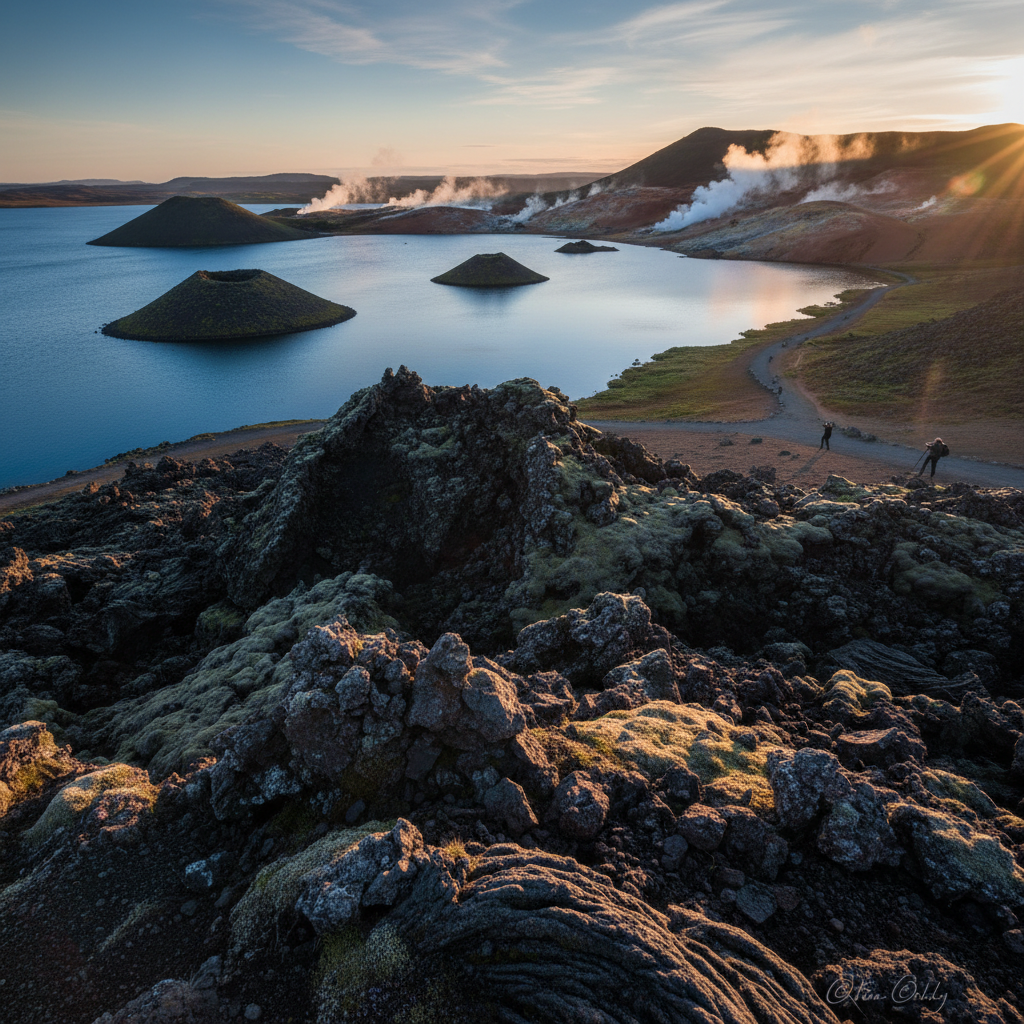
Lake Myvatn's Unique Features: Pseudocraters and Birdlife
Lake Myvatn itself is a central feature of the region, renowned not only for its tranquil beauty but also for its distinctive geological formations and unparalleled birdlife. These elements provide further rich subjects for your Myvatn photography.
Skútustaðagígar (Pseudocraters) Photography
The pseudocraters of Skútustaðagígar are one of Myvatn's most iconic sights. These unique formations are not true volcanic craters but were formed by steam explosions when molten lava flowed over wetlands, trapping water beneath it. The resulting mounds, often perfectly conical, are clustered along the lake's southern shore, creating a captivating landscape that is visually distinct from any other volcanic feature.
- How to Photograph These Formations:
- Utilizing Reflections: The pseudocraters are best photographed when the lake is calm, allowing for stunning reflections in the water. Position yourself to capture both the crater and its mirrored image, especially during sunrise or sunset when the light adds warmth and color.
- Leading Lines and Dynamic Compositions: Boardwalks wind through the pseudocraters, offering excellent leading lines that draw the viewer's eye into the scene. Use these paths to create depth and direct attention to specific formations. Experiment with low angles to emphasize their height and shape.
- Panoramic Views: From elevated points along the walking paths, you can capture sweeping panoramic views of the lake dotted with dozens of pseudocraters. A wide-angle lens is ideal for this, allowing you to convey the vastness and unique character of the landscape. Consider stitching multiple vertical shots for an ultra-wide panorama.
Birdlife Photography
Lake Myvatn is a globally important breeding ground for numerous species of waterfowl, particularly ducks. During the summer months, the lake teems with life, offering unparalleled opportunities for wildlife photography.
- Tips for Wildlife Photography:
- Telephoto Lens: An absolute must. A lens with a focal length of 300mm or more will allow you to get close-up shots without disturbing the birds.
- Patience and Observation: Wildlife photography requires patience. Find a good spot, set up, and observe the birds' behavior. Look for interesting interactions, preening, or flight patterns.
- Focus on Eyes: In wildlife photography, sharp focus on the eye of the animal is crucial for creating an engaging portrait.
- Early Morning/Late Evening: Birds are often most active during these times, and the soft light is also more flattering.
- Respecting Wildlife: This is paramount. Maintain a safe and respectful distance at all times. Do not approach birds too closely, make loud noises, or attempt to feed them. Use your telephoto lens to get your shot, not your feet. Disturbing nesting birds or their young can have serious consequences for their survival. Stay on marked paths to avoid trampling delicate habitats.
Myvatn's pseudocraters and abundant birdlife add another layer of photographic richness to this already diverse region, offering both grand landscapes and intimate wildlife encounters.
Mastering Myvatn's Light: Best Times and Conditions for Photography
The quality of light in Myvatn can transform a scene, and understanding how to leverage it is crucial for capturing truly exceptional photographs. Iceland's unique geographical position offers distinct lighting conditions throughout the year.
Golden Hour and Blue Hour
- Specific Advice for Myvatn: The "golden hour" (shortly after sunrise and before sunset) casts a warm, soft glow, enhancing the textures of lava formations and bringing out the vibrant colors of geothermal areas. Shadows become long and dramatic, adding depth to your compositions. The "blue hour" (just before sunrise and after sunset) offers a cool, ethereal light, perfect for moody landscapes, particularly around the lake and pseudocraters, where reflections can be stunning. In Myvatn, with its relatively flat landscapes and open skies, these hours can be truly spectacular, often lasting longer than in more mountainous regions. Plan to be at your chosen Myvatn photography spots well in advance to scout compositions.
Midnight Sun
- Techniques for Shooting During Continuous Daylight in Summer: From late May to late July, Myvatn experiences the midnight sun, where the sun barely dips below the horizon, providing continuous daylight. This means extended golden and blue hours, lasting for several hours rather than minutes.
- Managing Exposure and Contrast: While beautiful, the constant soft light can sometimes lack strong contrast. Use polarizing filters to deepen blue skies and reduce glare, enhancing saturation. Graduated neutral density (GND) filters can help balance bright skies with darker foregrounds, especially during the "peak" of the midnight sun when the sun is still relatively high.
- Embrace the Softness: This light is ideal for capturing intricate details in lava fields or the subtle textures of the landscape without harsh shadows. It allows for incredibly long shooting sessions, giving you ample time to refine compositions.
Northern Lights (Aurora Borealis)
Witnessing and photographing the aurora borealis is a bucket-list experience for many visiting Iceland. Myvatn, with its relatively dark skies away from major light pollution, is an excellent location for aurora hunting during the darker months (September to April).
- Planning and Preparation:
- Forecasts: Monitor the aurora forecast (Kp index) from the Icelandic Met Office, usually updated daily. A Kp index of 3 or higher is generally good, but even Kp 2 can yield visible aurora under clear, dark skies.
- Weather: Clear skies are essential. Check the cloud cover forecast for the Myvatn area.
- Lunar Cycle: A new moon offers the darkest skies, enhancing aurora visibility. A full moon can be challenging but can also beautifully illuminate the landscape.
- Location: Drive away from any light pollution. Good viewing spots include the areas around Skútustaðagígar, the road towards Dettifoss, or any open area with a clear view of the northern sky.
- Recommended Camera Settings: These are starting points and may need adjustment based on the aurora's intensity and ambient light.
- Manual Mode (M): Essential for full control.
- Wide-Angle Lens: f/2.8 or wider is ideal (e.g., 14mm-24mm) to capture a broad expanse of the sky.
- Aperture: Wide open, typically f/2.8 to f/4, to let in as much light as possible.
- ISO: Start at ISO 1600-3200. Adjust higher (e.g., 6400) if the aurora is faint, but be mindful of noise.
- Shutter Speed: Begin with 10-20 seconds. If the aurora is fast-moving, shorten to 5-8 seconds to capture its structure without blurring. If it's faint and static, you might go up to 25-30 seconds.
- Focus: Manual focus set to infinity. It's best to pre-focus on a distant light source (like the moon or a distant street light) before it gets too dark.
- White Balance: Auto or Kelvin (around 3200K-4000K) to capture the natural green/purple hues.
- Essential Equipment:
- Sturdy Tripod: Non-negotiable for long exposures.
- Remote Shutter Release: Prevents camera shake.
- Extra Batteries: Cold temperatures drain batteries quickly. Keep spares warm in an inner pocket.
- Headlamp with Red Light Mode: To see without affecting your night vision or disturbing others.
- Warm Clothing: You'll be standing still in cold conditions.
Mastering Myvatn's light, whether it's the extended golden hours, the endless midnight sun, or the elusive aurora, requires preparation, patience, and a willingness to adapt to the elements. These efforts will undoubtedly be rewarded with truly spectacular images.
Essential Photography Gear and Preparation for Myvatn
To fully capitalize on the diverse Myvatn photography spots, proper gear and preparation are non-negotiable. Iceland's environment is demanding, and being well-equipped will ensure both the quality of your photographs and your personal comfort and safety.
Camera and Lenses
- Camera Body: A mirrorless or DSLR camera with good low-light performance (especially important for aurora) and weather sealing is highly recommended.
- Lenses:
- Wide-angle Lens (14-24mm or similar): Essential for sweeping landscapes, volcanic craters, pseudocraters, and especially for capturing the full arc of the aurora. A fast aperture (f/2.8 or wider) is a bonus for night photography.
- Mid-range Zoom Lens (24-70mm or 24-105mm): Your workhorse lens for general landscape photography, Dimmuborgir formations, and everyday shots.
- Telephoto Zoom Lens (70-200mm or 100-400mm): Crucial for isolating details in the geothermal areas, capturing the abundant birdlife on Lake Myvatn, and compressing distant landscapes.
- Fast Prime Lens (e.g., 35mm or 50mm f/1.4-1.8): Excellent for low-light situations, particularly aurora photography, if you don't have a fast wide-angle zoom.
Tripod and Filters
- Sturdy Tripod: Absolutely essential for long exposures (waterfalls, low light, aurora), ensuring sharp images. A lightweight but robust carbon fiber tripod is ideal for travel.
- Filters:
- Polarizing Filter (CPL): Reduces glare on water and wet surfaces (like geothermal areas), deepens blue skies, and enhances color saturation.
- Neutral Density (ND) Filters: Allows for longer exposures in bright conditions (e.g., smoothing water, capturing clouds in motion). A variable ND filter or a set of fixed NDs (e.g., 3-stop, 6-stop, 10-stop) is highly useful.
- Graduated Neutral Density (GND) Filters: Balances exposure between a bright sky and a darker foreground, particularly useful during sunrise/sunset.
Protection
- Weather-Sealed Gear: If your camera and lenses are weather-sealed, they will offer better protection against Iceland's rain, snow, and wind.
- Rain Covers/Waterproof Camera Bag: Even with weather-sealed gear, a good rain cover for your camera and a waterproof backpack are invaluable.
- Lens Cloths and Blower: Essential for cleaning water droplets, dust, and geothermal residue from your lenses. Carry several.
- Dry Bags: For extra protection of sensitive electronics or spare batteries inside your camera bag.
Clothing
- Layering System: Iceland's weather changes rapidly. Dress in layers (base, mid, outer) that you can add or remove.
- Waterproof and Windproof Outer Shell: A high-quality jacket and pants are non-negotiable for protection against rain and strong winds.
- Sturdy, Waterproof Hiking Boots: With good ankle support and grip, essential for navigating uneven terrain, slippery paths, and potential mud or snow.
- Warm Hat, Gloves, and Scarf: Even in summer, evenings can be chilly, and in winter, these are critical for comfort during aurora hunts.
Drone Photography
Drones can offer spectacular aerial perspectives of Myvatn's unique landscapes, from the patterns of the pseudocraters to the vastness of the lava fields. However, responsible use and adherence to regulations are crucial.
- Regulations: As of 2026, Iceland adheres to European Union drone regulations, overseen by the Icelandic Transport Authority, requiring operator registration for most drones over 250g. Key points include:
- Registration: Drones over 250g typically require operator registration.
- Category: Most recreational drone use falls under the 'Open' category, with specific subcategories (A1, A2, A3) dictating proximity to people.
- No-Fly Zones: Prohibited areas include national parks (parts of Myvatn are protected), airports, military zones, and within 1.5 km of presidential residences. Always check local signage at specific Lake Myvatn photo locations.
- Privacy: Respect privacy; do not fly over private property without permission or capture identifiable individuals without consent.
- Safety: Maintain visual line of sight, do not fly above 120 meters (400 feet), and avoid flying in strong winds or adverse weather. Be mindful of wildlife, especially nesting birds.
- Responsible Use: often prioritize safety, privacy, and environmental protection. Be considerate of other visitors; drones can be noisy and intrusive. Check current regulations before your trip, as they can change.
Thorough preparation of your gear and clothing will allow you to focus on the creative aspects of your Myvatn photography, ensuring a productive and enjoyable trip.
Responsible Photography in Myvatn: Ethics and Safety
Myvatn is a fragile ecosystem and a place of immense natural beauty that we all have a responsibility to protect. As photographers, our actions have a direct impact on the environment and the experience of others. Embracing responsible photography practices is not just about ethics; it's about ensuring these incredible Myvatn photography spots remain pristine for generations to come.
Protecting Myvatn's Fragile Ecosystems
- Staying on Marked Paths: This is the golden rule in Iceland. The moss, lava, and geothermal ground are incredibly delicate and take decades, if not centuries, to recover from damage. Veering off paths, even for "the perfect shot," can cause irreparable harm. Stick to designated trails, boardwalks, and viewing platforms.
- Leave No Trace Principles:
- Plan Ahead and Prepare: Know the rules and regulations for the areas you'll visit.
- Travel and Camp on Durable Surfaces: Stay on trails.
- Dispose of Waste Properly: Pack out everything you pack in, including food scraps.
- Leave What You Find: Do not remove rocks, plants, or other natural objects.
- Minimize Campfire Impacts: Not applicable in most Myvatn areas, but a general principle.
- Respect Wildlife: See below.
- Be Considerate of Other Visitors: See below.
Respecting Local Wildlife, Private Property, and Other Visitors
- Wildlife: Myvatn is a haven for birds. When engaging in birdlife photography, maintain a respectful distance. Use your telephoto lens to get close-ups, rather than physically approaching the animals. Never disturb nesting birds, their young, or any other wildlife. Avoid sudden movements or loud noises.
- Private Property: Be aware of land ownership. Some areas around Myvatn are privately owned. often respect "No Trespassing" signs. If you're unsure, assume it's private.
- Other Visitors: Myvatn is popular. Be mindful of others enjoying the landscape. Avoid blocking views, setting up tripods in congested areas, or making excessive noise. If using a drone, be extra cautious about its noise and potential to disturb the peace for others.
Safety Precautions
Iceland's raw beauty comes with inherent risks. Being aware and prepared is key to a safe photography trip.
- Geothermal Areas (e.g., Hverir):
- Stay on Paths: The ground can be extremely hot, unstable, and thin in places. Boiling mud pots and scalding steam vents are dangerous.
- Fumes: The sulfur fumes can be strong and irritating, especially on windy days. If you have respiratory issues, exercise extra caution.
- Heat: Even the air can be hot near vents. Do not touch any ground or water unless explicitly stated it is safe.
- Slippery Terrain: Rain, moss, ice, and loose gravel can make paths and viewpoints very slippery. Wear sturdy, grippy footwear. Take your time, especially on inclines or declines.
- Volatile Weather Conditions: Iceland's weather can change in minutes. Strong winds, sudden rain, or even snow (even in summer at higher elevations) are common.
- Dress Appropriately: often have waterproof and windproof layers, even on a sunny day.
- Check Forecasts: Regularly check the local weather forecast from the Icelandic Met Office.
- Wind: Strong winds can make photography challenging and dangerous, especially near cliffs or with tripods. Secure your gear.
- Driving: Roads can be narrow, unpaved, or icy. Drive slowly and be aware of sheep, blind rises, and single-lane bridges.
By adhering to these ethical guidelines and safety precautions, you not only protect yourself and the environment but also enhance the experience for everyone who visits these incredible Lake Myvatn photo locations.
Frequently Asked Questions
What is the best time of year for Myvatn photography, especially for northern lights or midnight sun?
For the midnight sun, the best time is from late May to late July, offering nearly 24 hours of usable daylight and extended golden/blue hours. For the Northern Lights, the prime season is from September to April, with longer, darker nights increasing your chances. Autumn (September-October) offers a good balance, with potential for both aurora and vibrant autumn colors, while winter (November-March) provides the darkest skies for aurora but can have challenging travel conditions.
Are drones allowed for photography around Lake Myvatn, and what are the regulations?
Drones are generally allowed in many areas around Lake Myvatn, but with strict regulations. As of 2026, Iceland follows EU drone laws, requiring operator registration for most drones over 250g, as overseen by the Icelandic Transport Authority. Crucially, flying is often prohibited in national parks, nature reserves, and sensitive bird breeding areas, some of which exist around Myvatn. Always check local signage at specific sites, maintain visual line of sight, respect privacy, and do not fly over people or private property without permission. Always prioritize safety and environmental protection.
What are the absolute must-see Myvatn photography spots for a first-time visitor with limited time?
If time is limited, prioritize these essential Myvatn photography spots:
- Dimmuborgir (Dark Castles): For its unique lava formations and atmospheric walks.
- Hverir (Námafjall Geothermal Area): To capture vibrant colors, steaming vents, and bubbling mud pots.
- Skútustaðagígar (Pseudocraters): For iconic lake views and reflections.
How can I best protect my camera gear from the harsh elements and geothermal steam in Myvatn?
Protecting your gear in Myvatn's unpredictable environment is critical. Use weather-sealed camera bodies and lenses if possible. often carry a waterproof camera bag and dedicated rain covers for your camera and lenses. Keep multiple microfiber lens cloths handy to wipe away rain, spray, or geothermal condensation immediately. When in geothermal areas like Hverir, try to keep your gear away from direct steam, as the sulfur can be corrosive over time. Keep spare batteries warm in an inner pocket, as cold temperatures drain them quickly.
Is it safe to photograph in the geothermal areas like Hverir, and what precautions should I take?
Yes, it is generally safe to photograph in geothermal areas like Hverir, provided you follow all safety guidelines. The most important precaution is to often stay strictly on marked paths and boardwalks . The ground can be extremely hot, unstable, and thin, with boiling mud pots and scalding steam vents posing significant dangers. Be mindful of the strong sulfur fumes, which can be irritating, especially on windy days. Do not touch any ground, water, or formations. Wear sturdy, closed-toe shoes and be aware of your surroundings at all times. Prioritize your safety over any photo opportunity.
Conclusion: Your Myvatn Photography Adventure Awaits
The Myvatn region truly is a photographer's dream, a place where the raw forces of nature have crafted a landscape of unparalleled diversity and beauty. From the dramatic lava formations of Dimmuborgir and the vibrant, steaming earth of Hverir, to the serene pseudocraters reflecting in Lake Myvatn, and the possibility of the ethereal Northern Lights dancing overhead, every corner offers a unique visual narrative waiting to be captured.
We've explored the iconic Myvatn photography spots, delved into strategies for mastering Iceland's dynamic light, outlined essential gear, and emphasized the critical importance of responsible and safe photography. Armed with this knowledge, you are now well-prepared to embark on an unforgettable journey.
Myvatn is more than just a collection of sights; it's an experience that engages all your senses. Take your time, embrace the unpredictable weather, and allow yourself to be inspired by the sheer power and delicate beauty of this extraordinary corner of Iceland. Your Myvatn photography adventure awaits, promising a wealth of stunning images and lasting memories.
Ready to capture Iceland's magic? Explore our detailed photography maps for the Myvatn region and other stunning locations across Iceland to plan your next adventure!