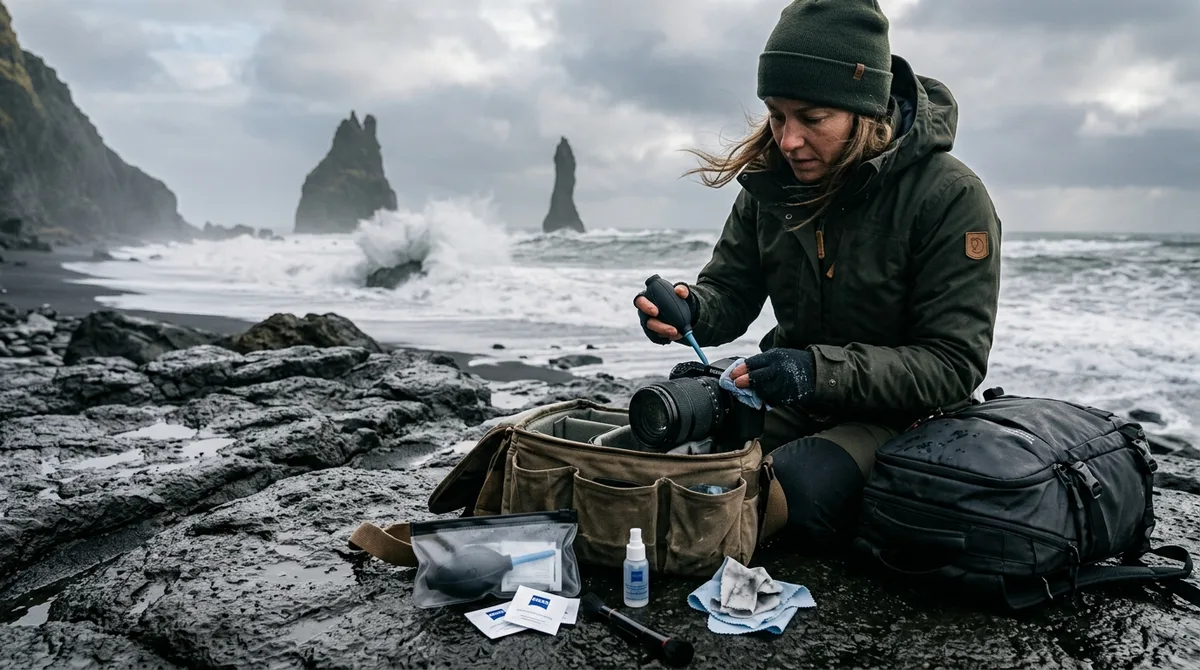
A specialized Iceland photography gear cleaning kit is essential to prevent permanent physical damage to front lens coatings and image sensors caused by high-velocity basalt sand, aerosolized Atlantic sea salt, and mineralized waterfall vapor. Standard camera cleaning habits fail in Iceland's wind-driven coastal environment; protecting your equipment requires a precise sequence of mechanical grit removal, chemical salt dissolution, and sealed field storage.
Why Iceland's Extreme Environment Demands a Dedicated Cleaning Strategy
Iceland presents a harsh trifecta of optical hazards: corrosive marine salt spray, airborne volcanic grit, and relentless mineralized mist. Shooting along coastal headlands or near giant waterfalls exposes camera bodies and lenses to environmental stressors far exceeding standard studio or woodland environments.
At coastal locations like Reynisfjara black sand beach or Stokksnes, Atlantic gales atomize seawater into fine liquid aerosols containing dissolved salts—primarily sodium chloride (NaCl) and magnesium chloride (MgCl₂). According to the National Oceanic and Atmospheric Administration (NOAA), typical seawater contains roughly 3.5% dissolved salts by weight. When these airborne droplets hit warm glass front elements or lens barrels, the water rapidly evaporates in the wind, leaving behind microscopic, highly hygroscopic salt crystals. These crystals draw ambient moisture from the air, forming an ionic film that attacks fluorite and anti-reflective multi-coatings on professional glass. If wiped while dry, the crystal lattice acts like fine sandpaper, creating permanent micro-abrasions across the front element.
Volcanic ash and fine basaltic grit create a distinct physical threat. Icelandic black sand consists heavily of crushed basalt and silica, which is physically harder than standard optical crown glass and anti-reflective coatings. High-velocity winds across the south coast can force this grit into zoom ring seams, focus barrel helicoids, and weather-sealing gaskets. Using a standard lens cloth without pre-blowing airborne particles away will grind silica sand directly into the glass.
At giant cascades such as Skógafoss, Dettifoss, and Aldeyjarfoss, airborne water vapor carries suspended volcanic minerals, silica, and calcium compounds dissolved from upstream bedrock. When this mineral mist sheets over optics and dries, it leaves cloudy mineral rings that resist basic microfiber drying.
Standard studio cleaning supplies fail rapidly under these conditions:
- Reusable Microfiber Cloths: Once exposed to marine fog, reusable cloths trap salt crystals and basalt dust within their weaves. Using them a second time rubs abrasive grit back across optic elements.
- Standard Cleaning Fluids: Alcohol-heavy lens cleaners evaporate too quickly to dissolve sodium chloride crystals, leaving sticky salt rings behind.
- Freezing Spray Conditions: Damp cloths freeze into rigid ice sheets in sub-zero spray zones near glacier lagoons like Jökulsárlón, rendering them useless for field polishing.
Core Components of a Field-Ready Iceland Photography Gear Cleaning Kit
Building a robust Iceland photography gear cleaning kit requires selecting tools designed to isolate contaminants before they scrape delicate optical coatings or enter the mirror box. Your kit must separate mechanical debris removal from liquid salt dissolving.
To ensure field readiness during long drives along the Ring Road or interior F-roads, organize your kit around these specialized components:
| Kit Component | Field Function | Why Standard Gear Fails in Iceland |
|---|---|---|
| High-Volume Rocket Air Blower | Removes loose basalt dust, volcanic ash, and dry sand without touching optical glass. | Canned compressed air freezes liquid propellant onto cold lenses and drops pressure in cold temperatures. |
| Vacuum-Sealed Microfiber Cloths | Single-use, individual foil-wrapped cloths ensure zero dust or salt cross-contamination. | Exposed microfibers inside open camera bags absorb airborne coastal salt and trap silica grit. |
| Pure Distilled Water Spray | Breaks down and dissolves ionic sodium chloride bonds on front elements and filters. | Isopropyl alcohol evaporates too fast to dissolve salt crystals and can smear greasy saline film. |
| Optical Sensor Swabs (Individually Sealed) | Lifts sticky mineral residue from sensor glass stacks in controlled micro-environments. | Standard static brushes smear wet coastal moisture across sensor glass instead of lifting it. |
| Goat-Hair Detail Brush | Cleans grit from zoom rubber ridges, lens mounts, and button seams. | Synthetic rigid brushes can scratch paint and press micro-sand deeper into weather gaskets. |
High-Volume Air Blowers vs. Compressed Gas Cans
A manual, high-volume rubber rocket blower is mandatory. Selecting a blower with a rear inlet check valve helps prevent airborne dust from being drawn into the bulb and propelled onto your sensor. Avoid canned compressed gas in Iceland: cold ambient temperatures cause the propellant gas (such as tetrafluoroethane) to drop in pressure and potentially spew liquid aerosol residue onto your front element, damaging delicate fluorine coatings.
Microfiber Cloth Management Protocol
Avoid relying on a single microfiber towel tucked into a pocket. Pack two distinct classes of cloths: bulk commercial microfibers for wiping down wet camera bodies, tripod legs, and rubber zoom grips; and individually vacuum-sealed, lint-free optical microfibers reserved exclusively for bare optical elements. Once an optical cloth touches coastal spray, discard or isolate it in a dedicated pouch until it can be laundered in distilled water.
Purified Optical Cleaners and Solvents
Pack two separate liquid droppers: pure distilled water to break down salt residue and a non-streaking, ammonia-free optical fluid safe for multi-layer hydrophobic coatings. Distilled water breaks down stubborn sea-salt crusts, while professional optical solvent removes fingerprint oils and remaining films.
Sensor Cleaning Swabs for Extreme Environments
Pack frame-matched sensor swabs (24mm for full-frame, 16mm for APS-C) enclosed in individual vacuum packaging. Wet sensor swabbing requires high-purity sensor solvents that dry quickly without leaving fluid rings under cold, humid conditions.
Battling Salt Spray and Mist: Removing Salt Spray From Camera Lens Optics
Salt spray from high-energy coastlines forms an invisible, greasy sheen before crystallizing into hard spots. Wiping this film incorrectly will degrade your lens's anti-reflective coatings and reduce image contrast.
Executing a careful step-by-step procedure for removing salt spray from camera lens elements avoids damaging expensive glass:
- Blast Away Dry Mechanical Particles: Before applying any liquid or cloth, use your high-volume rocket blower with the lens facing downward. Blow off loose basalt sand and dust from the front element and filter threads.
- Apply Distilled Water to Dissolve Salt Residue: Avoid spraying liquid directly onto the front element to prevent fluid from migrating past optic seals. Apply 2–3 drops of pure distilled water onto a fresh, single-use optical tissue or microfiber cloth. Lightly dab the damp cloth onto the glass to rehydrate and dissolve the hardened salt crystals.
- Perform a Single-Pass Lift: Gently roll the damp cloth across the glass surface in a single directional pass. Do not scrub back and forth; this drags remaining dissolved salt across the optical plane.
- Polish with Dedicated Optical Fluid: Follow up immediately with a second clean wipe lightly dampened with specialized lens cleaning fluid. Wipe from the center outward in a continuous spiral motion to clear remaining streaks and oil residues.
- Inspect under Direct Light: Angle the front element toward a headlamp or light source to verify that no residual halo or salt film remains.
Protecting front filter threads is equally important. Coastal sea spray easily creeps into the fine screw threads of protective UV or ND filters. When sea salt gets trapped between metal filter rings and lens barrels, it can initiate corrosion that makes filter removal difficult. Prevent this by unscrewing front filters every evening, wiping the threads with a damp distilled-water cloth, and ensuring the threads are thoroughly clean and dry before reattaching.
Tackling Volcanic Dust and Cleaning Camera Sensors in Iceland
Changing lenses near black sand beaches or during high-wind events introduces airborne basalt particulate directly into the camera throat. Once inside, dry sensor dust quickly becomes sticky when exposed to Iceland's humid coastal air.
When test shots reveal dark dust spots, follow strict environmental safeguards for cleaning camera sensors in Iceland:
Selecting a Safe Cleaning Environment
Avoid exposing an open camera sensor box outdoors in Iceland. High coastal winds create continuous micro-eddies of airborne grit. Instead, construct a sheltered environment:
- Rental Vehicle / Campervan: Sit in the back seat with all doors and windows closed. Turn on the vehicle climate control on internal recirculate mode for two minutes to let suspended cabin dust settle before opening your camera body.
- Windproof Shelter or Tent: If backpacking, clean the sensor inside a fully zipped tent body after allowing wind-blown dust to settle.
Pre-Cleaning the Mount Throat
Before releasing the lens bayonet, thoroughly brush and blow away all basalt sand trapped along the lens mount, rubber sealing gasket, and outer camera housing. If grit sits on the bayonet edge when you detach the lens, the movement created by removing the rear optic can draw sand directly onto the sensor filter glass.
Static Brushes vs. Wet Sensor Swabs
Dry static sensor brushes work well for loose, static-charged airborne dust in dry climates. However, in Iceland, humidity and mineral mist cause volcanic ash particles to adhere lightly to the IR cut filter glass over the sensor stack. Attempting to drag a dry brush over adhering mineral dust can scratch the cover glass. Wet swabbing with specialized sensor fluid is a safe method to lift stuck particles.
Apply 1–2 drops of sensor fluid to the tip of a fresh, size-matched swab. Allow the fluid to spread across the swab tip for 5 seconds (it should be damp, not dripping). Place the swab edge at one side of the sensor, tilt at a 60-degree angle, and drag smoothly across the sensor face in one continuous motion. Flip to the unblemished side of the swab and make a single return pass. Discard the swab immediately after one use.
Packing and Organizing Your Iceland Photography Gear Cleaning Kit on the Trail
Keeping your Iceland photography gear cleaning kit dry, accessible, and free of sand cross-contamination requires an organized pack layout.
Implement a two-zone dry-bag organization system inside your photo pack:
Zone 1: Quick-Access Optics Pouch (Exterior Pocket)
Keep a small, roll-top waterproof dry bag (1-2 liters) in an easily accessible exterior pocket of your camera bag. This pouch should hold emergency field-wiping gear needed while actively shooting in rain or waterfall spray:
- 1x High-volume rocket air blower
- 5x Single-use sealed wet lens wipes
- 2x Fresh vacuum-sealed microfiber cloths
- 1x Small travel spray bottle of distilled water
Zone 2: Deep-Pack Maintenance Kit (Interior Compartment)
Store your full repair and sensor kit inside a heavy-duty, submersible dry pouch stowed deep within your main camera compartment. This kit is reserved for mid-day vehicle stops or evening maintenance routines at your hotel or campsite:
- Full-frame / APS-C sensor cleaning swabs and high-purity sensor fluid
- Goat-hair detail brushes and precision cotton swabs
- Spare distilled water and dedicated optical cleaner droppers
- Color-coded microfiber reserve supply
- Replacement desiccant packs
Managing Desiccant Packs and Bag Humidity
Opening camera bags continuously in wet coastal environments traps humid air inside main pack compartments. Place two or three silica gel desiccant packs inside your camera bag compartments. Check the desiccant color daily. If saturated, recharge them overnight using your campervan’s heater vents or hotel room radiators to ensure they absorb ambient moisture during daytime shooting along the South Coast photography locations.
Waterfall and Geothermal Tactics: Adapting Cleaning Workflows by Location
Different geographical features in Iceland present distinct optical challenges. Adapting your protection and cleaning routines to match the local terrain minimizes time spent wiping glass and prevents moisture damage.
Waterfall Spray Zones
Powerful cascades produce heavy airborne water volumes. When shooting close to giant waterfalls, implement these protective steps:
- Keep a wide lens hood attached at all times. Lens hoods serve as physical shields against diagonal wind-blown mist, keeping the front glass element dry for precious extra seconds.
- Use a transparent silicone or neoprene camera rain cover sealed tightly around the front edge of the lens hood.
- Work with a "cover and reveal" shooting cadence: Keep a dry, thick microfiber towel draped over the lens hood while composing on a tripod. Lift the towel only for the duration of your shutter exposure or exposure bracket, then recover the lens immediately.
When building long itineraries through high-density cascade routes—such as those detailed in our Iceland waterfall photography category—working efficiently in spray zones keeps your glass clear without stalling your daily shooting schedule.
Geothermal Basins and Sulfuric Fumes
Geothermal locations like Hverir, Námaskarð, and Geysir present atmospheric sulfur dioxide (SO₂) and hydrogen sulfide (H₂S) gases combined with superheated steam. When ambient humidity mixes with volcanic sulfur gas, it forms mild acidic precipitation that can pit glass coatings and deteriorate soft exterior rubber grips.
Avoid changing lenses anywhere downwind of geothermal steam vents. When finished shooting in geothermal areas, wipe down the exterior metal and rubber parts of your camera body and lens barrel with a cloth dampened with distilled water to neutralize residual sulfur compounds.
Emergency Moisture Interventions and Overnight Drying Workflows
Even with rigorous precautions, rogue waves along black sand beaches or intense wind squalls can completely soak camera equipment.
Emergency Seawater Ingress Protocol
If a saltwater wave splashes directly over your camera and lens, react instantly:
- Power Down Immediately: Turn off the camera body and remove the main lithium-ion battery instantly to break electrical circuits and prevent short-circuiting.
- Do Not Zoom or Focus: Avoid operating physical lens rings, which forces salt water past outer rubber weather seals into internal optical barrels.
- Freshwater External Wipe-down: Thoroughly wipe down the exterior chassis with a towel soaked in clean fresh water to remove salt residue before it dries into internal crevices.
- Isolate and Dry: Place the body and lens into a sealed bag packed with fresh silica gel packs. Do not turn the camera back on until it has dried thoroughly for at least 24 to 48 hours.
Safe Drying Procedures in Vehicles and Campervans
Drying wet camera gear inside a rental vehicle requires care. rarely place cold, wet lenses directly in front of blasting hot dashboard heating vents. Rapid thermal expansion can stress internal glass elements, melt internal lubricants, and cause condensation to form inside sealed optical chambers. Instead, place damp gear in an area with indirect, ambient airflow while running the vehicle's air conditioning system (which acts as a dehumidifier) set to a moderate temperature (20°C / 68°F).
Essential Maintenance Checklist Before and After Your Trip
Consistent maintenance routines before departure, during field travel, and after returning home protect your gear investments against long-term corrosion.
Pre-Trip Preparation
- Perform a baseline sensor spot audit: Mount a clean prime lens, stop down to f/22, and shoot a bright uniform background (such as an even white wall). Import the image into editing software, boost contrast, and note existing sensor dust spots.
- Inspect rubber weather-sealing gaskets around battery doors, memory card slots, and lens mount bayonets for cracking or debris.
- Pack all cleaning liquids in leak-proof, double-sealed ziplock bags to withstand air pressure changes during flights.
Daily Evening Field Routine
- Wipe all tripod legs, flip locks, and center columns with a fresh water towel to remove salt crust and black sand grit.
- Inspect front lens elements and sacrificial protective filters under direct room light; perform distilled water salt-dissolving wipes where necessary.
- Recharge desiccant packs and air-dry open camera bags away from direct damp environments.
Post-Expedition Maintenance
- Perform a thorough deep clean of all lens mounts using a soft brush and optical cleaning swabs.
- Wash contaminated reusable microfiber towels in hot water without fabric softeners, using a double-rinse cycle with distilled water to strip out trapped salts.
- Inspect lens barrel helicoids for grinding sounds caused by stray basalt dust.
Equipping yourself with physical cleaning supplies is only half of field readiness in remote regions. When gale-force winds and sea spray knock out mobile network coverage along distant fjords, staying on track depends on having reliable access to offline navigation data on your personal device.
Before heading out into unpredictable coastal weather, review our sourced comparison of Iceland photography guides to understand how different planning tools handle offline workflows. Compare Iceland Photo Map with the alternatives on their own terms rather than claiming a superlative; our comparative breakdown highlights exact trade-offs so you can choose the right system for your shooting style.
When using mapped field data, downloading your files ahead of time ensures seamless operation on location. The KML, GPX, and GeoJSON files live on your device, so the waypoints work with no signal. Downloading offline map tiles is a separate step inside your mapping app. If you prefer using handheld units or phone apps, detailed tutorials like our guide to importing KML waypoints into Gaia GPS make setting up reliable offline maps simple. Buying does not create an account—the files are emailed and downloadable directly. If the file does not load on your device, email within 30 days and we either get it working or refund you. The coordinates are published as an open CC-BY dataset; what is sold is the curation, the file formats, and the season and access notes—not secrecy. The files carry season and access notes, not live conditions; check Veðurstofa Íslands (vedur.is) and Road.is for current weather and road status.
Frequently Asked Questions
Can salt spray permanently damage my camera lens coating in Iceland?
Yes. Sea spray contains sodium chloride and magnesium chloride crystals that bind tightly to glass coatings as moisture evaporates. If wiped while dry, hard salt crystals cause microscopic scratches across delicate anti-reflective coatings. If left on optics for days, moist salt film can slowly react with fluorine coatings, degrading anti-fog performance and reducing glass contrast.
Is it safe to perform sensor cleaning outdoors during an Iceland road trip?
No. Opening a camera mount box outdoors in Iceland exposes the mirror chamber to high-velocity airborne basalt dust and microscopic sea spray mist. often perform sensor cleaning inside a sheltered micro-environment, such as a sealed rental vehicle interior with the climate control set to internal recirculate, or inside a fully zipped tent.
What is the best way to dry soaked camera equipment in a rental vehicle or campervan?
Avoid blasting high heat directly onto damp lenses, which can cause condensation to form inside sealed optical chambers and melt protective lubricants. Instead, run your vehicle’s air conditioning at a moderate, comfortable warm setting (around 20°C / 68°F). The air conditioning system dehumidifies cabin air, pulling ambient moisture safely out of damp gear without damaging electronics or optical seals.
Should I use distilled water or specialized lens cleaner for sea spray residue?
Use a two-step process: First, use a single drop of distilled water on an optical cloth to dissolve hardened salt crystals. Isopropyl-based optical cleaners evaporate too quickly to break down ionic salt bonds effectively. Once salt crust is dissolved and gently lifted away with distilled water, finish with specialized lens cleaning fluid to strip away residual oily films or streaks.
Plan your photography stops efficiently so you spend less time cleaning and more time making images. Download offline waypoint files from Iceland Photo Map—the KML, GPX, and GeoJSON files live on your device so location access works seamlessly with no signal.