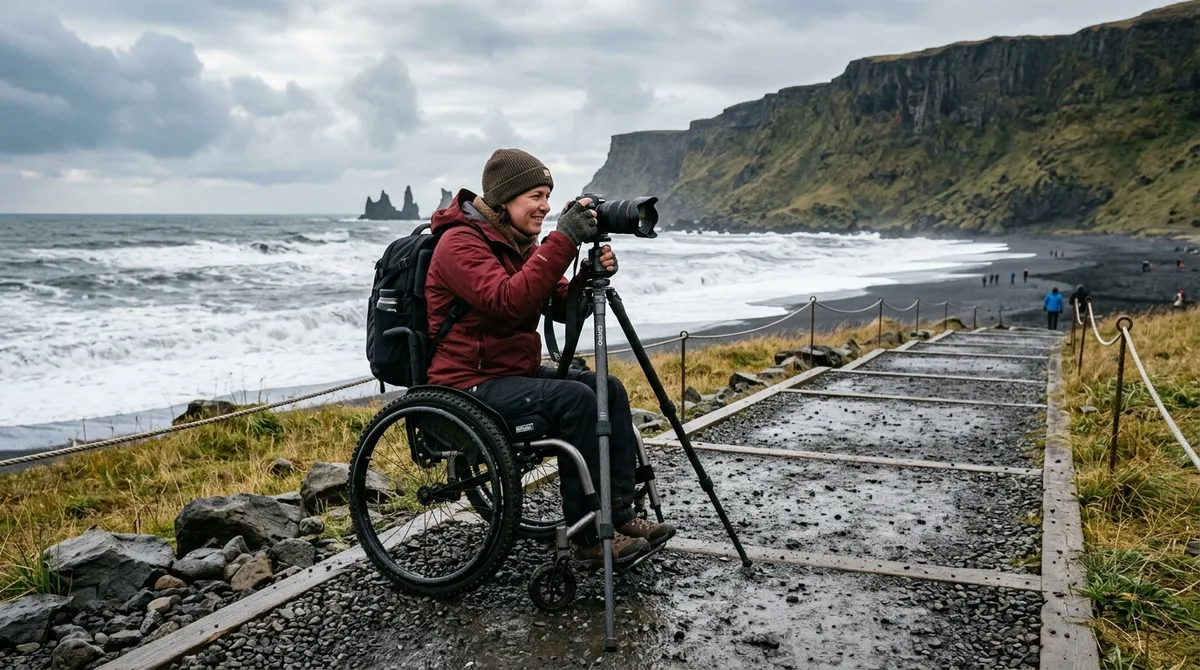
Using Iceland photography location accessibility ratings allows landscape photographers to calculate exact physical transit times, evaluate terrain obstacles for heavy gear, and avoid missed golden hours caused by underestimated trail conditions. By standardizing physical demands on a predictable scale, you can accurately match your equipment load and personal mobility level to each shooting location across Iceland's varied volcanic terrain.
Planning a photography expedition to Iceland involves far more than tracking sunrise times and cloud cover. A viewpoint that appears simple on a digital satellite preview might require navigating ankle-deep mud, loose basalt scree, or steep timber stairs that become treacherous in freezing spray. Understanding how terrain accessibility grades work ensures your shoot schedule remains realistic, safe, and productive.
Understanding Iceland Photography Location Accessibility Ratings: The 1-to-5 Mobility Scale
Standard travel guide descriptions like "an easy walk" or "just off the road" are notoriously misleading for landscape photographers. A light stroll for an unencumbered hiker wearing trail runners can turn into a grueling or hazardous journey when you are carrying a 15-kilogram backpack filled with camera bodies, heavy telephoto lenses, glass filters, and a rigid tripod. To plan effectively, photographers rely on a standardized 1-to-5 accessibility grading scale that measures the physical realities of the landscape.
- Grade 1 (Fully Paved & Barrier-Free): Smooth asphalt, level concrete, or ADA-compliant timber boardwalks with gentle inclines (< many grade). Viewpoints are reachable via rolling gear cases and standard mobility equipment without steps or unpaved transitions. Parking is adjacent to or within 100 meters of the vantage point.
- Grade 2 (Firm, Compacted Surface): Well-maintained, hard-packed fine gravel or wide dirt trails with minimal elevation change (< 20 meters total). Easily manageable for photographers carrying full kits or using rugged all-terrain utility carts. Distances from parking rarely exceed 300 meters.
- Grade 3 (Uneven Natural Terrain): Narrow dirt paths, exposed tree roots, loose gravel, embedded volcanic stones, or moderate stair climbs (20–50 meters of elevation gain). Requires sturdy hiking boots with ankle support. Photographers must carry all equipment in backpacks; rolling cases and wheeled carts cannot navigate these surfaces.
- Grade 4 (Rugged Backcountry & Steep Slopes): Unstable volcanic scree, steep ascents, slippery mud banks, boulder hopping, or shallow river crossings. Requires active scrambling, high physical endurance, and hands-free gear carry systems. Transit times often exceed 30 to 60 minutes one way.
- Grade 5 (Technical or Remote Alpine Access): Glacial traverses requiring crampons and ice axes, unmarked canyon routes, or deep river fords accessible only by high-clearance modified 4x4 vehicles. Demands specialized wilderness survival gear and technical mountaineering competence.
When assessing these grades, landscape photographers must also account for the time of day. Navigating a Grade 2 gravel trail in broad daylight is vastly different from traversing the same path during the pitch darkness of astronomical twilight before sunrise or during an overnight aurora shoot. Ice sheets, hidden potholes, and lack of visual horizon markers substantially increase navigation fatigue and physical risk. The coordinates are published as an open CC-BY dataset. What is sold is the curation, the formats and the season and access notes — not secrecy.
Wheelchair Accessible Photo Spots in Iceland with Paved Boardwalks
Iceland features an expanding network of infrastructure designed to protect fragile subarctic vegetation while providing barrier-free viewing platforms. For photographers with mobility challenges or those operating heavy rolling studio cases, several of the country's most iconic geological landmarks offer world-class vantage points directly on paved trails and timber platforms.
Several prime wheelchair accessible photo spots Iceland offers are located along the popular Golden Circle route:
- Gullfoss (Upper Viewpoint): The upper parking area connects directly to an asphalt and wide timber walkway leading to the upper canyon rim. This paved platform provides a clear, elevated view down into the double cascade of the Hvítá river gorge. The lower pathway features numerous wet timber steps and heavy mist, making the upper platform the preferred barrier-free vantage point.
- Geysir Geothermal Area: The main geothermal field at Haukadalur features wide, hard-surfaced pathways with gentle gradients connecting the visitor center to the erupting Strokkur geyser. Smooth wooden safety rails line the trail, keeping photographers at a safe distance from boiling geothermal runoff while providing level surfaces for tripod deployment.
- Þingvellir (Thingvellir) National Park: The Hakid visitor center viewpoint at the top of the Almannagjá fault line features a broad, gently sloping wooden ramp and paved boardwalk. It provides sweeping vistas over the rift valley and Lake Þingvallavatn without requiring steps. You can review accessibility guidelines directly on the official Þingvellir National Park website.
In the southern and southeast regions, Vatnajökull National Park provides several accessible vistas. The primary parking lot at the Jökulsárlón glacier lagoon opens immediately onto a paved viewing apron overlooking the main ice lagoon. While descending to the water's edge involves loose sand and gravel, the upper paved perimeter allows telephoto shooting of drifting icebergs with unobstructed sightlines. Nearby, the Skaftafell visitor center features paved connector paths leading to flat, barrier-free viewing areas oriented toward the Skaftafellsjökull glacier tongue.
When shooting from designated boardwalks, tripod etiquette and safety are essential. Foot traffic from other visitors creates micro-vibrations across interconnected wooden planks, which can ruin long exposures. To mitigate this, use higher shutter speeds, weight your tripod central column, or shoot during low-traffic windows at sunrise. often ensure tripod legs do not block passing wheelchairs, strollers, or emergency egress routes along narrow ramps.
Easy Access Photography Locations in Iceland Requiring Minimal Walking
When rapid weather transitions demand quick setup times, or when travel schedules limit hiking opportunities, targeting easy access photography locations Iceland maintains along its main highways can yield dramatic results with minimal physical exertion.
Numerous world-class viewpoints sit within 100 meters of paved parking bays along Route 1 (the Ring Road) and regional feeder roads:
- Skógafoss: The base of this massive 60-meter waterfall is reachable via a flat, wide gravel path extending directly from the primary parking area. You can capture wide-angle foreground compositions of the cascading water and riverbed within a three-minute walk from your vehicle, avoiding the 500+ metal steps leading to the upper viewing platform.
- Seljalandsfoss: While the cavernous trail leading behind the waterfall is wet, rocky, and slippery, the paved front perimeter trails allow full-frame captures of the entire falls with zero climbing. The paths connecting the main parking lot to the primary front vantage point are level and compacted.
- Kirkjufellsfoss (Snæfellsnes Peninsula): The lower footbridge approach at Kirkjufellsfoss sits roughly 150 meters from the paid parking lot along a maintained gravel track. It provides the classic composition framing the twin waterfalls in the foreground with Mount Kirkjufell rising in the background.
In addition to roadside footpaths, coastal driving routes along the Snæfellsnes Peninsula and the Reykjanes Peninsula provide opportunities for bad-weather, vehicle-based shooting. During fierce Atlantic gales, locations such as the black church of Búðakirkja, the coastal lava fields near Arnarstapi harbor, and the Reykjanesviti lighthouse allow photographers to frame stunning compositions through an open vehicle window or by stepping just a few feet from their vehicle door.
While roadside convenience speeds up your workflow, it introduces creative tradeoffs. Because these viewpoints are universally accessible, compositions can easily appear standard or over-photographed. To elevate images taken at easy-access locations, experiment with extreme focal lengths, unique foreground elements like seasonal lupines or river ice patterns, and disciplined timing around unconventional atmospheric lighting conditions.
How Weather and Seasonal Conditions Shift Iceland Photography Location Accessibility Ratings
An accessibility rating for an Icelandic photography location is not static; it changes dramatically depending on season, wind speed, and precipitation. A gentle Grade 1 or Grade 2 walking trail in July can instantly transform into a treacherous Grade 4 obstacle during winter or shoulder seasons.
Winter ice buildup is the most common factor altering trail ratings. Sub-zero temperatures and freezing waterfall spray routinely glaze timber boardwalks and packed gravel pathways in transparent sheets of black ice. Locations like Gullfoss, Seljalandsfoss, and Goðafoss often require the use of stainless steel microspikes or crampons simply to walk safely from the vehicle to the viewing railing. Without traction cleats, even a flat path becomes an acute slipping hazard that can damage delicate camera bodies and long lenses.
Wind exposure is another critical variable. Coastal cliffs such as Dyrhólaey on the South Coast and the basalt arches of Arnarstapi on the Snæfellsnes Peninsula experience sudden, violent wind gusts exceeding 25 to 30 meters per second (55–67 mph). In these exposed environments, even flat clifftop platforms present stability risks for photographers with limited mobility. Heavy wind loads can catch large front elements or telephoto lens hoods, toppling carbon fiber tripods instantly.
Because environmental conditions in the subarctic shift rapidly, access notes and baseline season indicators must always be cross-referenced with live national monitoring services. The files carry season and access notes, not live conditions. Check vedur.is and road.is for current weather and road status. Daily road closures, severe weather warnings, and highland track updates are actively maintained by Vegagerðin (the Icelandic Road and Coastal Administration) and the Icelandic Meteorological Office (Veðurstofa Íslands).
Essential Tripod and Gear Logistics for Rugged Versus Paved Shooting Points
Selecting appropriate equipment transport and camera support systems depends directly on the accessibility rating of your planned shooting locations. Misjudging the terrain often leads to physical exhaustion or broken equipment.
| Accessibility Tier | Primary Terrain Surface | Recommended Luggage / Transport | Optimal Tripod Foot Configuration | Lens & Filter Strategy |
|---|---|---|---|---|
| Paved / Grade 1 | Timber boardwalks, smooth asphalt, level concrete | Hard-shell rolling cases (e.g., Pelican/Think Tank) or lightweight daypacks | Standard rubber feet (prevents wood damage and slipping) | Full prime lens kit, multi-slot filter holders, heavy 3-way geared head |
| Easy / Grade 2 | Hard-packed fine gravel, compacted soil | All-terrain wheeled utility cart or ergonomic backpack | Rubber feet or broad rubber claw pads | Standard zoom trinity (14-24mm, 24-70mm, 70-200mm), magnetic circular filters |
| Rugged / Grade 3–4 | Basalt scree, mud, boulder fields, river beds | Technical mountain backpack with internal aluminum frame and waist belt | Stainless steel rock spikes or tripod snow/mud baskets | Compact zoom pair (e.g., 16-35mm, 24-105mm), screw-on ND/CPL filters |
For timber boardwalks and paved viewpoints, rubber tripod feet provide necessary traction without marring surfaces. However, when working on rugged Grade 3 or Grade 4 terrain—such as the wet basalt boulders surrounding Kvernufoss or the loose scree paths near Hverfjall crater—steel spikes are indispensable. They bite through topsoil, moss, and loose gravel down to solid bedrock, anchoring your camera securely during high-wind long exposures.
Weight management becomes critical when moving between accessibility tiers. When shooting roadside Grade 1 and Grade 2 locations, carrying redundant backup bodies, heavy f/2.8 zoom glass, and oversized gimbal heads is manageable. When transitioning to remote Grade 3 and Grade 4 locations, stream your kit down to essential tools: one versatile camera body, two lightweight zooms, a single carbon fiber tripod, and circular magnetic filters. Keeping your pack weight below 10–12 kilograms conserves physical stamina and improves balance over treacherous terrain.
How to Integrate Accessibility Notes into Your Digital Map Workflow
Managing an efficient photography shoot across Iceland requires integrating spatial location data, access levels, and terrain notes directly into your digital mapping tools before you leave your accommodation. Having access notes embedded alongside coordinates ensures you rarely arrive at a trailhead unprepared for the physical demands of the shoot.
Using downloadable GPX, KML, and GeoJSON waypoint collections allows you to carry location-specific access and season details directly on your device. Buying does not create an account. The files are emailed and downloadable directly. These standardized file formats integrate smoothly into mobile GIS tools and GPS navigation software. The KML, GPX and GeoJSON files live on your device, so the waypoints work with no signal. Downloading offline map tiles is a separate step inside your mapping app.
To establish a reliable on-trail navigation workflow, pair your curated waypoints with dedicated outdoor mapping applications:
- Import Waypoint Datasets: Load your KML or GPX files into third-party offline mapping tools such as Gaia GPS, OsmAnd, or Organic Maps. The files are waypoints. Your own mapping app — Gaia GPS, OsmAnd, Organic Maps, a Garmin — does the routing.
- Verify Parking-to-Viewpoint Distances: Use the topographic and satellite layers within your mapping application to measure the exact linear distance and elevation profile between the marked parking waypoint and the shooting viewpoint.
- Calculate Realistic Timing: Allocate baseline hiking speeds based on the terrain grade. On Grade 1 and Grade 2 surfaces, budget a standard 4 km/h walking pace. On Grade 3 and Grade 4 volcanic scree or muddy inclines, reduce your transit planning pace to 1.5–2 km/h to account for heavy equipment packs and tripod balance.
Spatial access notes allow you to pre-plan multi-stop shooting days with high accuracy. 112 of the 121 locations carry a researched brief compiled from published sources, each listing its sources. These are distinct from the 9 locations with written field notes. 9 of the 121 locations carry written field notes today. Every location carries coordinates, category and season.
If you are exploring digital mapping resources for your itinerary, compare the options carefully based on your operational needs. Compare Iceland Photo Map with the alternatives on their own terms rather than claiming a superlative; the site publishes a sourced comparison at iceland photography guides compared that concedes where rivals are stronger. If the file does not load on your device, email within 30 days and we either get it working or refund you.
For mobile users looking for dedicated companion tools, Iceland Co-Pilot is live on Google Play, Android only, and included free with any Iceland Photo Map purchase — it is not sold separately and there is no separate Co-Pilot tier. The location catalog, field notes, parking and access notes, and arrival detection work today; full offline map tiles, light windows, road and weather status, and day routing are still in development.
Common Accessibility Pitfalls Landscape Photographers Encounter in Iceland
Even seasoned photographers encounter unexpected access barriers in Iceland when they rely solely on standard tourist advice. Avoiding these common logistical traps will protect your equipment and keep your shooting itinerary on track.
1. The Black Sand Trap
Locations like Reynisfjara black sand beach and Diamond Beach (Breiðamerkursandur) appear flat and easy on casual inspection. In practice, the loose, granular volcanic sand severely hinders mobility equipment, luggage wheels, and heavily loaded camera trolleys. Heavy carts sink into the soft basalt gravel within meters of leaving the asphalt. Photographers must carry equipment in backpacks and fit tripod legs with wide snow/mud baskets to prevent them from sinking unevenly during wave-receding exposures.
2. Overlooking Paid Parking Lot Walkups and Shuttles
At several popular spots, vehicle access ends significantly farther from the shooting perspective than anticipated. For example, accessing the active volcanic fields around Fagradalsfjall requires ascending designated mountain paths with 200–300 meters of elevation gain over rough lava fields from the pay-and-display lots. In highland destinations like Landmannalaugar, private vehicles without high wading clearance must stop before the final unbridged river crossing, adding an extra kilometer of walking across a footbridge to reach the main campsite and trailheads.
3. Underestimating Spray Zones and Gorge Footing
Approaching powerful waterfalls like Dettifoss (particularly from the rugged eastern bank via Route 864) or the hidden canyon waterfall Kvernufoss involves navigating narrow, perpetually saturated paths. Constant mist covers nearby basalt rocks in slick algae and standing water. Photographers focusing on their viewfinders often misstep on loose rocks or submerge boots in hidden mud holes. often equip your lenses with waterproof covers, keep microfiber cloths in an easily accessible pocket, and verify your footing before looking through the viewfinder.
Frequently Asked Questions
What are Iceland photography location accessibility ratings based on?
Iceland photography location accessibility ratings evaluate four primary physical criteria: distance from the designated parking area to the shooting vantage point, total elevation gain and steepness, trail surface composition (e.g., paved asphalt, timber boardwalks, compacted gravel, loose volcanic scree, mud, or boulder fields), and the presence of physical barriers like steps, stiles, or unbridged stream crossings.
Which famous Iceland photo spots are fully wheelchair accessible?
Fully wheelchair accessible photography spots featuring paved paths or ADA-grade boardwalks include the upper viewing platform at Gullfoss, the main paved paths through the Geysir geothermal field at Haukadalur, the Hakid panoramic viewpoint at Þingvellir National Park, and the primary parking viewing apron overlooking the Jökulsárlón glacier lagoon.
Can I photograph the Northern Lights from accessible parking areas in Iceland?
Yes. Many easily accessible locations along the Ring Road and coastal peninsulas—such as the parking areas at Skógafoss, Búðakirkja, and the perimeter overlooks at Jökulsárlón—offer clear, dark-sky views oriented toward the north and northwest. These spots allow you to shoot aurora displays directly beside your vehicle on flat, firm ground without navigating dangerous backcountry trails in the dark.
How does winter weather affect accessibility ratings at Iceland waterfalls?
Winter weather substantially increases trail difficulty at waterfalls like Gullfoss, Seljalandsfoss, and Goðafoss. Sub-zero temperatures freeze blowing mist onto surrounding timber boardwalks, viewing platforms, and gravel trails, converting gentle Grade 1 and Grade 2 paths into slippery sheets of black ice. Navigating these viewpoints safely during winter typically requires traction spikes, crampons, and reinforced tripod feet.
Download our comprehensive Iceland photography waypoint dataset to access precise parking coordinates, category tags, and terrain access notes directly in your favorite mapping app.