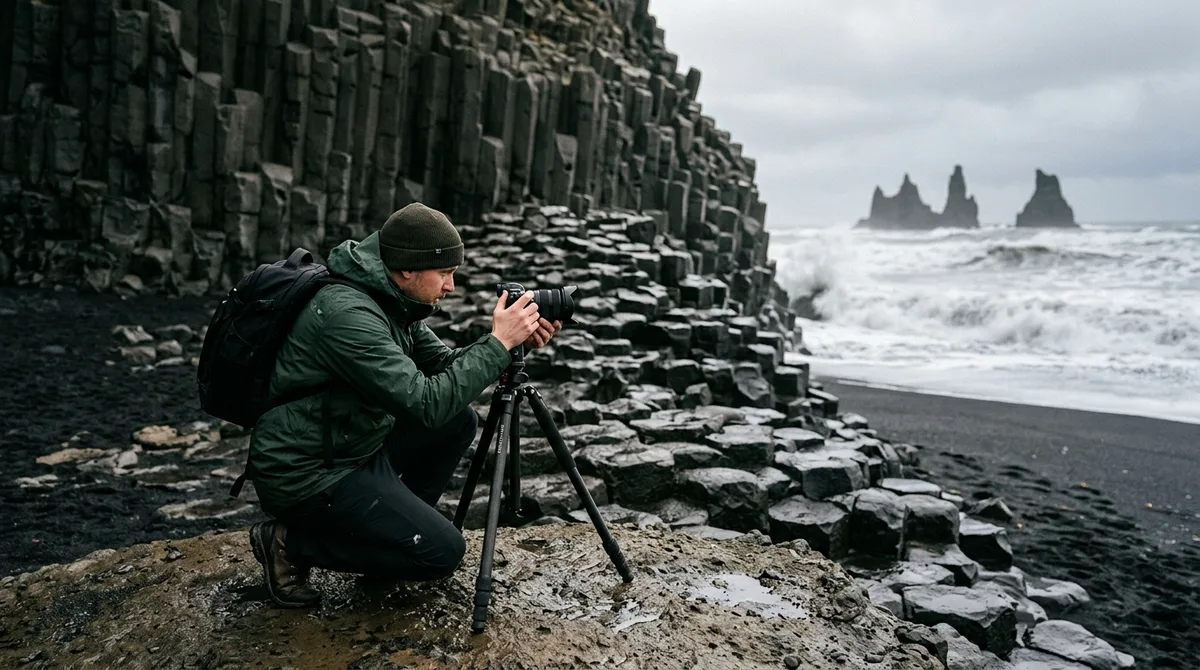
Applying traditional Iceland photography composition rules requires unlearning the habits developed in temperate, tree-lined environments where scale and depth are easily established. Mastering Nordic composition demands disciplined foreground anchoring, intentional perspective control, and rigorous edge patrol to translate massive, treeless geological formations into balanced, two-dimensional frames.
Why Scale and Contrast Challenge Standard Iceland Photography Composition Rules
Iceland's sub-Arctic terrain presents a unique spatial paradox for landscape photographers: the near-total absence of mature trees, standard architectural cues, and familiar human-scale references distorts depth perception. When looking across the volcanic expanses of the Highlands or the vast glacial outwash plains (sandurs), distant 800-meter rhyolite peaks can appear indistinguishable from nearby 50-meter hills without deliberate visual cues. Relying on default compositional habits often yields flat, lifeless images where monumental landforms feel diminished.
To overcome this scale distortion, modern Iceland photography composition rules prioritize precise structural anchoring. In wide-open tundra or black sand plains, the human eye cannot gauge distance without a continuous chain of visual references. If you frame a distant glacier like Vatnajökull with an empty, featureless foreground of flat basalt gravel, the brain compresses the intervening distance, causing the glacial tongue to lose its physical magnitude.
Solving this spatial challenge requires three fundamental adjustments in perspective:
- Deliberate Horizon Placement: rarely place the horizon arbitrarily across the center of your frame unless executing deliberate reflection symmetry. Push the horizon to the upper third to emphasize expansive foreground textures, or drop it to the lower third to let towering basalt peaks or dramatic sky formations dominate the scene.
- Continuous Depth Stepping: Build a three-tier depth hierarchy consisting of an immediate micro-foreground (50 cm to 2 meters from the lens), a contextual midground (such as a braided river bend or terminal moraine), and the distant geological formation.
- Luminance and Texture Contrast: Volcanic landscapes often exhibit extreme tonal divergence—such as pitch-black basalt opposing brilliant glacial ice or vibrant emerald moss. Balance these high-contrast zones so that neither the deep shadows nor the highlights trap the viewer's eye in an unintended corner of the frame.
Photographers exploring curated Iceland landscape photography locations must consciously scout for structural elements that bridge this empty midground void, turning vast emptiness into an active compositional asset.
Harnessing Leading Lines in Iceland Photography: Rivers, Ridges, and Coastal Geometry
The Icelandic landscape is shaped by powerful hydrological and tectonic forces that carve dramatic linear paths across the terrain. Effectively using leading lines in iceland photography requires identifying how these natural contours interact with wide-angle lens distortion to guide the viewer’s eye toward your primary focal point.
Braided glacial rivers (jökulár) provide some of the most dynamic graphic lines in Nordic photography. When captured from elevated vantages—such as ridge overlooks along the South Coast or during aerial sweeps—these sediment-rich channels create sweeping, organic curves of silver, ochre, and turquoise. To maximize their compositional energy at ground level, position your tripod at the apex of a river bend. Use an ultra-wide focal length (14mm to 20mm on full-frame systems) and align the converging channels along diagonal axes, drawing the eye from the bottom corners directly toward the distant mountain or ice cap.
Volcanic ridges, arêtes, and fault lines—such as the exposed fissures across the Reykjanes Peninsula and Þingvellir—offer rigid, angular vectors. When composing along a jagged volcanic ridge, align the knife-edge crest along the Golden Ratio diagonal. This anchors the compositional weight while directing visual flow across the frame. Keep your camera level or use subtle tilt movements to prevent vertical keystoning unless you are deliberately exaggerating the peak's height.
Coastal environments introduce rhythmic, fluid geometry. Along the black basalt sands of Reynisfjara or Stokksnes, receding surf creates ephemeral foam lines that trace the shoreline's contours. To transform these temporary lines into structural compositional pathways:
- Time the Wave Receding Phase: Set a shutter speed between 0.5 and 1.5 seconds. As the wave draws back into the ocean, the moving foam renders as crisp, luminous streaks that pull the viewer’s gaze into the frame.
- Position the Low-Tide Curvature: Align the arc of the wet, reflective sand along the lower third of your frame, using the glossy mirror finish to reflect directional twilight.
- Anchor the Terminus: Ensure the linear foam path leads directly toward a distinct anchor, such as the sea stacks of Reynisdrangar or the jagged horn of Vestrahorn, rather than exiting the frame abruptly.
Essential Foreground Anchors: Basalt Columns, Ice Chunks, and Volcanic Rock
In wide-angle landscape composition, foreground selection determines whether an image feels immersive or detached. A weak or absent foreground leaves the viewer stranded outside the scene, whereas an intentional foreground anchor establishes physical presence and depth.
Columnar basalt formations—formed through the slow, uniform cooling of thick basaltic lava flows—provide geometric foreground anchors. Sites like the canyon surrounding the Aldeyjarfoss waterfall showcase symmetrical hexagonal and pentagonal columns that frame turbulent glacial water. When using basalt columns as foreground elements:
- Exploit the Geometric Tessellation: Lower your tripod to within 0.5 to 1 meter of the column tops. The repeating geometric patterns create a structured baseline that contrasts against the chaotic spray of falling water.
- Maintain Sharpness via Focus Stacking: Because wide-angle lenses suffer from edge softness and optical diffraction at small apertures (f/16 to f/22), shoot a 3-to-4-shot focus stack at f/8 or f/11. Ensure the nearest hexagonal edge, located mere inches from your front element, is critically sharp through to the distant canyon wall.
- Manage Specular Highlights: Wet basalt reflects intense sky glare. Rotate a circular polarizing filter (CPL) to control reflections on the top surfaces of the columns, revealing the rich charcoal and iron-rich orange patina beneath.
At Breiðamerkursandur (Diamond Beach), stranded iceberg fragments provide natural foreground anchors against jet-black volcanic sand. Balance is essential: avoid cluttering the lower third with dozens of scattered ice chunks. Instead, isolate a single, translucent block with clean edges. Position your camera low—roughly 30 to 50 cm off the sand—so the ice chunk breaks the horizon line, merging foreground and background into a unified visual structure.
Applying Rule of Thirds and Golden Ratio to Dynamic Waterfall Formations
Iceland's massive waterfalls generate intense physical energy, immense spray plumes, and steep vertical scale. Applying classical landscape photography composition tips like the Rule of Thirds and the Golden Ratio (Fibonacci Spiral) prevents these chaotic torrents from overwhelming the composition.
When photographing asymmetrical, multi-tiered cascades, the Golden Spiral is an effective compositional framework. Align the primary curve of the river canyon along the wide sweep of the spiral, guiding the eye through the churning plunge pool and resting the tightest curl directly on the waterfall's crest. This structural technique works exceptionally well across winding river gorges found throughout Icelandic waterfall locations.
For towering, linear waterfalls like Skógafoss or Seljalandsfoss, the standard Rule of Thirds provides stability. Place the vertical water column along either the left or right vertical grid line, dedicating the remaining two-thirds of the frame to the surrounding moss-covered basalt amphitheater and the escaping spray cloud. This asymmetrical balance introduces atmospheric tension and highlights the cliff's sheer verticality.
However, rigid adherence to the Rule of Thirds can undermine compositions where the environment exhibits powerful natural symmetry. In deep box canyons or cavernous falls, dead-center symmetry delivers undeniable impact. Placing the waterfall precisely along the central vertical axis emphasizes cathedral-like containment, using the canyon walls as flanking brackets that lock the viewer's attention onto the plunging water.
Field Adaptations for Iceland Photography Composition Rules Under Shifting Light
High-latitude lighting conditions in Iceland require continuous compositional adjustments. During the summer months, the sun skims the horizon for hours, producing an extended golden hour with low-angle, directional light that casts elongated shadows across volcanic tephra fields. In the shoulder months and winter, sudden cloud breaks and snowstorms can alter visual balance in seconds.
Under low-angle Arctic sunlight, directional side-lighting carves deep relief into textured surfaces like the Eldhraun lava field or braided river beds. Align your composition perpendicular to the light source to leverage cross-lighting, using the alternating bands of golden highlights and deep shadows as secondary leading lines.
When heavy cloud cover dominates—a frequent occurrence verified by the Icelandic Meteorological Office (Veðurstofa Íslands)—standard high-contrast rules no longer apply. Soft, overcast conditions eliminate harsh dynamic range, making it ideal to focus on intimate textures, subtle color gradations in rhyolite mountains, and vibrant green mosses. In flat lighting, avoid dedicating significant frame space to a featureless white sky; tilt the camera downward to create intimate, sky-less landscape extractions.
Managing extreme contrast between snow, ice, and dark basalt requires careful balance:
- Exposure Bracketing: Capture bracketed sequences (-2, 0, +2 EV) when framing deep basalt shadows against luminous glacial tongues to prevent clipping highlight details or losing shadow texture.
- Managing Spray and Wind: In heavy spray zones, adjust your focal length to 24mm–70mm to step back from the moisture zone. This protects your front element while compressing the midground elements for a tighter composition.
- Color Temperature Harmony: In twilight conditions, the blue-hour cast on glacial ice contrasts naturally against warm ambient highlights. Position warm-toned elements (such as illuminated turf roofs or golden grasses) along opposing thirds to create complementary chromatic balance.
Framing Isolated Human Elements and Architecture for Scale
While purist landscape photography often avoids man-made structures, isolated human elements provide invaluable scale reference within vast Nordic terrain. A lone turf church, a coastal lighthouse, or a distant hiker instantly contextualizes the monumental scale of surrounding 1,000-meter sea cliffs and sprawling ice fields.
Historic architecture—such as the black timber church at Búðir or traditional turf-roofed chapels—relies on isolation to convey mood. When composing scenes with isolated buildings:
- Maintain Negative Space: Avoid crowding the structure against the edges of the frame. Surround the building with expansive negative space (open meadows, rugged lava fields, or moody skies) to preserve its feeling of remote solitude.
- Offset Against Mountain Backdrops: Position the roofline so it sits cleanly against a dark mountain face rather than cutting clumsily through the horizon. This tonal separation ensures the architectural silhouette stands out clearly.
- Use Human Figures Intentionally: If placing a person in the frame for scale, position them at a significant distance in the midground, looking into the landscape rather than toward the camera. A brightly colored technical jacket (red, yellow, or teal) creates an effective focal accent against muted black and green terrain.
When framing compositions in fragile environments, environmental stewardship must take precedence over creative ambitions. Strictly follow guidance from the Environment Agency of Iceland and SafeTravel Iceland by staying on designated paths. Trampling delicate sub-Arctic moss (Racomitrium lanuginosum) causes damage that takes decades to recover. Telephoto lenses (70-200mm) allow you to compress distances and isolate architectural elements without stepping off marked trails.
Common Landscape Photography Composition Pitfalls to Avoid in Iceland
Even seasoned photographers encounter composition traps when working across Iceland’s dramatic terrain. Recognizing these common errors helps ensure clean, intentional framing in the field.
The primary compositional error is visual overcomplication. Confronted by a scene containing a waterfall, basalt columns, distant glaciers, dramatic clouds, and black sand, photographers often attempt to capture everything in a single 14mm frame. The result is visual chaos where no single element anchors the viewer's attention. Apply subtraction: identify your primary subject, select a single complementary foreground anchor, and frame out extraneous distractions.
Another frequent issue is tripod height inertia. Most photographers deploy their tripod at standard standing eye level (1.5 to 1.7 meters), resulting in repetitive, flat perspectives. Raising the tripod to 2 meters can untangle overlapping ridges in complex braided river channels, while dropping it down to 15 centimeters emphasizes the texture of cracked mud or volcanic sand.
| Compositional Error | Visual Consequence | Corrective Field Technique |
|---|---|---|
| Eye-Level Tripod Placement | Flat perspective; disconnected foreground and midground | Drop camera to 10–30 cm for intimate texture, or elevate to untangle braided paths. |
| Unintentional Horizon Splitting | Static, indecisive frame balance | Commit to upper or lower third based on whether sky or terrain carries visual weight. |
| Cluttered Edge Patrol | Stray rock fragments or bright spots pulling the eye off-frame | Conduct a systematic four-corner viewfinder check prior to capture. |
| Overcrowded Wide-Angle Scenes | Distant mountains appear tiny; lack of focal clarity | Switch to 35mm–70mm to compress background scale and isolate key subjects. |
Practical In-Field Checklist for Composing Nordic Landscapes
Before locking your tripod head and pressing the shutter, execute this systematic 5-step field checklist to ensure your composition is balanced, sharp, and intentional.
- Step 1: Visual Scouting Without the Camera: Walk the location with your naked eye or a mobile viewfinder. Identify the primary geological subject, the direction of ambient light, and potential natural lines before setting up gear.
- Step 2: Establish Tripod Elevation and Distance: Deliberately choose camera height. Get low (15–30 cm) to exaggerate basalt geometry or ice textures, or set up high on a ridge to separate braided water channels.
- Step 3: Conduct a Four-Corner Edge Patrol: Slowly scan the edges of your optical viewfinder or LCD. Eliminate distracting clipped rocks, bright spots of foam, or extraneous trail markers along the borders of the frame.
- Step 4: Check Linear Flow and Horizon Level: Ensure your leading lines guide the viewer's eye into the scene rather than out of the frame. Verify horizontal leveling using your camera's dual-axis electronic level to prevent tilted marine or glacial horizons.
- Step 5: Verify Depth of Field and Sharpness: Check your hyperfocal distance. If your foreground anchor is within one meter of the lens, shoot a multi-point focus stack at f/8–f/11 rather than stopping down to f/22, which introduces optical softness from diffraction.
Planning your route around changing seasonal light is essential for executing these techniques. Exploring a structured 7-day Iceland photography itinerary helps you align your field workflow with optimal sun angles and directional illumination across diverse regional terrains.
Frequently Asked Questions
How do I show accurate scale when photographing massive Icelandic landscapes?
To convey true scale across treeless terrain, introduce a recognizable scale reference into your midground, such as an isolated turf church, a lighthouse, or a distant hiker. Additionally, establish a clear three-tier depth hierarchy (micro-foreground, midground channel, distant peak) or use a telephoto lens (70-200mm) to compress distance, making massive background peaks loom realistically over midground terrain.
What is the best focal length for landscape composition in Iceland?
A 16-35mm wide-angle lens is standard for dramatic foreground-to-background near-far compositions, particularly at waterfalls and black sand beaches. However, a 70-200mm telephoto lens is equally crucial in Iceland for isolating distant rhyolite mountain layers, compressing braided glacial rivers, and capturing mountain peaks without wide-angle perspective distortion.
How can I use leading lines effectively on Iceland's black sand beaches?
On black sand beaches, set your shutter speed between 0.5 and 1.5 seconds to capture the receding ocean surf as clean, white foam trails that draw the eye toward sea stacks or headlands. You can also use the curvilinear boundaries between dry matte sand and wet, reflective tidal flats to guide visual movement across the frame.
Should the horizon line be centered or placed on a third in Icelandic mountain scenes?
Place the horizon along the lower third when dramatic cloud formations or atmospheric aurora displays dominate the scene, and shift it to the upper third to emphasize rich foreground textures like basalt columns or volcanic sand. Reserve a centered horizon specifically for scenes with clean reflection symmetry, such as calm glacial lagoons or mirror-like coastal tidal pools.
Download the curated Iceland Photo Map waypoints to seamlessly load coordinate data into your preferred navigation app for easy scouting across Iceland's most photogenic terrain. The files are waypoints. Your own mapping app — Gaia GPS, OsmAnd, Organic Maps, a Garmin — does the routing.