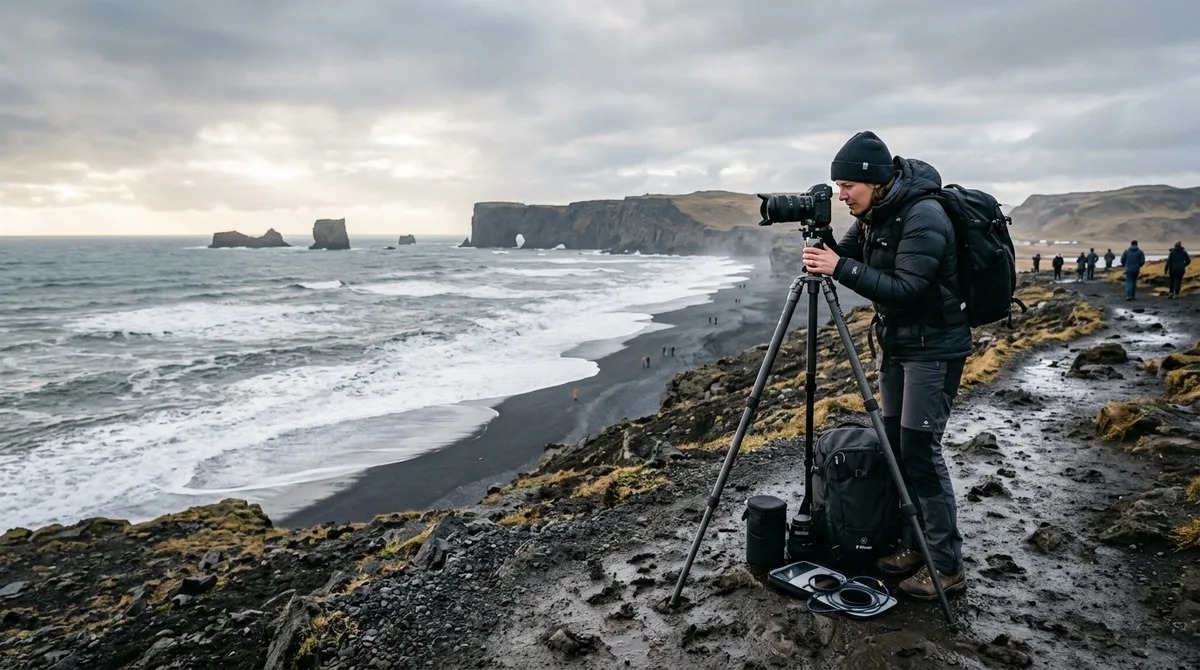
Photographing South Coast Iceland photo spots requires mastering directional maritime light, calculating tide cycles at coastal cliffs, and deploying strict spray management protocols at massive waterfall drops. Spanning roughly 400 kilometers from Selfoss to Höfn along Route 1, this corridor concentrates volcanic sands, sea stacks, and calving glaciers within accessible proximity for landscape photographers.
Capturing compelling imagery along this dynamic stretch demands more than pulling onto the gravel shoulder. High-velocity katabatic winds, dense glacial silt, persistent sea spray, and abrupt weather transitions require deliberate technical choices. Whether you are balancing exposure brackets inside wet canyon throats or timing wave motion against ice fragments on black basalt sand, navigating South Coast Iceland photography locations requires a deep understanding of seasonal illumination angles, geological scale, and field safety.
Top Tier South Coast Iceland Photo Spots: Iconic Waterfalls and Canyons
The transition from the southern lowlands into the volcanic escarpments creates an extraordinary concentration of vertical water drops. Each location presents distinct optical challenges involving moisture, contrast, and field-of-view constraints.
Compositional Framing for Seljalandsfoss and Gljúfrabúi
Seljalandsfoss plunges 60 meters over an ancient sea cliff, offering the rare opportunity to walk directly behind the water curtain. To frame this amphitheater effectively, mount an ultra-wide focal length between 14mm and 18mm on a full-frame sensor. From behind the falls looking west, the contrast between the dark basalt cavern ceiling and the bright open sky often exceeds 5 stops of dynamic range. Execute a 3- to 5-frame exposure bracket (at 1-stop intervals, ISO 100, f/8 to f/11) to preserve highlight detail in the sky and falling spray while pulling clean shadow data from the cave interior.
A few hundred meters north lies Gljúfrabúi, partially concealed inside a narrow rock gorge. To photograph Gljúfrabúi, you must wade through ankle-deep stream water into a tight cylindrical cavern. The vertical spray here is relentless. Position your tripod low over the stream bed, framing the cylindrical cliff walls with a 14mm lens pointed upward at a 30-degree angle. Keep your camera bagged and sealed until composition and focus are locked, wipe the front element with a dedicated hydrophobic lens cloth, trip the shutter immediately via a 2-second timer, and replace the lens cap instantly.
Managing Dynamic Range and Severe Mist at Skógafoss and Kvernufoss
Skógafoss generates one of the most powerful mist clouds in Iceland due to its 25-meter width and 60-meter drop. Frontal compositions at 24mm capture the sheer symmetry of the rectangular cascade, but standard long exposures (1 to 5 seconds) often result in a blown-out, featureless white wall of spray. Instead, use a shutter speed between 1/250s and 1/1000s to retain crisp, textural striations in the churning water column, or introduce a 3-stop neutral density (ND) filter with exposures kept near 1/4s to 1/2s to smooth the foreground river while retaining waterfall definition.
Just east of Skógafoss lies Kvernufoss, nestled within a secluded gorge. Unlike its thundering neighbor, Kvernufoss is flanked by steep, moss-covered basalt columns that frame the falls in natural green leading lines. Shooting from behind Kvernufoss requires a 16–35mm zoom lens. Morning light illuminates the eastern walls of the gorge without casting harsh, direct glare on the falling water. For a complete geographic index of falls across the island, reference the curated Iceland waterfall photography map.
Compositional Depth and Vantage Points at Fjaðrárgljúfur Canyon
Fjaðrárgljúfur is a roughly 100-meter-deep canyon carved through ancient palagonite rock by glacial runoff and the Fjaðrá river. To emphasize the sinuous, serpentine bends of the canyon floor, use a 24–70mm standard zoom at 35mm to 50mm from the elevated eastern rim viewpoints. This focal length compresses the winding green promontories without distorting the scale of the canyon walls.
Sub-arctic mosses covering the rim are extremely delicate and take decades to regenerate if crushed, requiring photographers to shoot strictly from designated timber and steel viewing platforms. Arrive during the shoulder hours of early morning or late afternoon when low-angle directional light accentuates the vertical ridges and textured shadows of the canyon walls.
Coastal Drama: Vik Photo Spots and Volcanic Black Sand Beaches
The coastline surrounding Vík í Mýrdal represents one of the most volatile maritime photography environments in the North Atlantic. Volcanic black sand, relentless oceanic swells, and towering sea stacks produce endless compositional variety for photographers hunting classic Vik photo spots.
Catching Directional Dawn Light on Reynisdrangar Basalt Stacks
The Reynisdrangar sea stacks rise up to 66 meters out of the ocean off the southern tip of Mount Reynisfjall. While many photographers shoot them from Reynisfjara beach to the west, photographing them at dawn from the black sand beach at Vík í Mýrdal provides superior side-lighting. In the morning, the rising sun illuminates the eastern vertical facets of the basalt pinnacles, casting long, dark shadows westward across the incoming breakers.
Compose with a 70–200mm telephoto lens at roughly 100mm to 135mm. By compressing the distance between the breaking white surf lines and the dark spires, you emphasize the monolithic scale of Reynisdrangar against the open sea. Use an aperture of f/8 or f/11 at ISO 100, pairing a circular polarizer (CPL) to balance the high-sheen reflection on wet black sand while maintaining deep contrast in the oceanic foam.
Tide Level Strategies and Composition Angles from Dyrhólaey
Dyrhólaey is a 120-meter volcanic promontory that acts as a natural vantage point over the southern shoreline. From the upper lighthouse plateau, you can look northwest across the vast black gravel expanse of Kirkjufjara or look east toward the massive natural volcanic rock arch plunging into the sea.
Timing your shoot relative to the tide cycle is critical:
- Low Tide: Exposes intricate black sand ripples, sea-foam patterns, and tidal pools along the base of the cliffs, offering detailed foreground textures for wide-angle compositions (16–24mm).
- High Tide: Drives violent Atlantic swells directly against the sea cliffs and through the central cavity of the rock arch, ideal for high-speed action captures (1/1000s to 1/2000s) with a 100–400mm lens.
Note: Dyrhólaey has seasonal access restrictions during the spring nesting season (typically May to late June) to protect Atlantic puffins and common eiders. Plan your visit accordingly if traveling during late spring.
Reynisfjara Safety Zones and Telephoto Compression
Reynisfjara is renowned for its Gardar cliff of stepped basalt columns and Hálsanefshellir sea cave. However, it is also one of the most hazardous coastlines in the world due to unpredictable sneaker waves. These waves surge significantly higher up the sloping beach face without warning due to long-period ocean swells building momentum over thousands of kilometers of uninterrupted open sea.
Maintain an uncompromising safety protocol: never turn your back to the ocean, and observe the operational beach warning lights (Green, Yellow, Red) installed near the parking facility. For photography, prioritize telephoto lenses (70–200mm or 100–400mm) stationed safely in the upper gravel zone. Telephoto focal lengths let you isolate breaking wave crests colliding with the columnar basalt cliffs, compressing spray particles against dark rock without placing your physical safety or optical gear in the tidal surge zone. Review coastal safety updates and active alerts via SafeTravel Iceland before working close to the shoreline.
Glacier Outlets and Ice Lagoons Across the Southeastern Corridor
The southeastern fringe of South Coast Iceland is dominated by Vatnajökull, Europe's largest ice cap by volume. As outlet glaciers descend into coastal outwash plains, they form massive proglacial lagoons and deposit ancient glacial ice directly onto the shoreline.
Jökulsárlón: Isolating Calved Icebergs and Reflections
At Jökulsárlón Glacier Lagoon, icebergs calve from the Breiðamerkurjökull glacier tongue and drift continuously toward the narrow oceanic outlet channel, driven by shifting tides and surface currents.
Because the ice is constantly drifting, standard multi-second long exposures often render icebergs as blurry, indistinct white shapes. To keep drifting bergs pin-sharp while retaining smooth water reflections, follow this workflow:
- Set your camera to Manual exposure mode, keeping shutter speed between 1/60s and 1/250s depending on drift velocity.
- Rotate a Circular Polarizer (CPL) to cut surface water glare and reveal deep cyan and electric blue refraction within the submerged glacial ice structures.
- Use a focal length of 35mm to 85mm to balance individual sculpted icebergs in the mid-ground against the distant backdrop of Vatnajökull's mountain ridges.
Breiðamerkursandur (Diamond Beach): Wave Motion Shutter Speed Calculations
Directly across Route 1 from Jökulsárlón lies Breiðamerkursandur, where ocean tides wash polished, translucent ice blocks onto pitch-black basalt sand. Photographing these stranded ice sculptures requires balancing wave motion with crystal clarity.
The critical technical variable at Diamond Beach is shutter speed. A shutter speed that is too fast (1/500s) freezes water into chaotic, noisy droplets that distract from the clear ice. A shutter speed that is too slow (5+ seconds) turns the ocean into a flat, milky mist, erasing the receding water trails. Target the sweet spot: 1/4s to 2 seconds.
Drop your tripod low to the sand (15cm to 40cm above the ground), use a 16–35mm lens focused carefully on a stable, grounded piece of clear ice, and trigger the shutter just as a retreating wave rushes back toward the sea. The receding water creates dramatic white leading lines wrapping around the dark base of the ice block.
Svínafellsjökull and Fjallsárlón: Scale Isolation and Mountain Backdrops
Fjallsárlón presents an intimate glacial calving wall set directly beneath the Öræfajökull stratovolcano. A 70–200mm lens allows you to isolate individual ice towers and pressure ridges along the glacier's terminus against the jagged, snow-dusted ridges above.
At nearby Svínafellsjökull, dramatic lateral moraines and jagged blue seracs provide incredible opportunities for scale isolation. Frame a hiking figure or a distant guide wearing high-visibility outerwear against the massive, cracked crevasse fields using a 100mm+ focal length. This compositional approach instantly conveys the sheer, monumental scale of Iceland's glacial geology.
Seasonal Light Angles and Golden Hour Strategies for South Iceland Photography
Because Iceland sits between 63° and 66° North latitude, solar elevation angles vary drastically throughout the year, fundamentally changing how South Iceland photography must be approached across seasons.
Summer Midnight Sun Arcs (June through July)
During June and July, true astronomical night does not occur. The sun dips slightly below the northern horizon before rising again, creating a continuous 3- to 4-hour golden and blue hour transition between 23:00 and 03:00. Because South Coast landmarks primarily face south and west, the low midnight sun tracks horizontally along the northern horizon, casting soft, warm, non-directional rim light over southern mountain peaks and sea stacks.
This allows you to invert your operational schedule: sleep during the high-glare daytime hours (11:00 to 17:00) and conduct all primary field photography between 21:00 and 04:00. This strategy guarantees exceptional lighting while completely bypassing daytime tour traffic at locations like Seljalandsfoss and Skógafoss.
Winter Solar Elevation and Low-Angle Light (November through February)
In mid-winter, the sun rarely rises higher than 3 to 8 degrees above the southern horizon. The entire 4 to 5 hours of daily daylight functions as one continuous low-angle golden hour. However, this creates extreme backlighting conditions along south-facing coastal positions. Deep shadows are cast northward across Route 1 by the massive Eyjafjallajökull and Mýrdalsjökull massif systems.
When shooting directly into the southern winter sun over the North Atlantic, utilize graduated neutral density filters (2-stop or 3-stop soft edge) or capture manual 3-frame exposure brackets to prevent dynamic range clipping. Keep lens hoods attached at all times to minimize destructive optical flare across your lens elements.
Shoulder Season Aurora Alignments (September–October and March–April)
The shoulder months provide an optimal balance of moderate daylight lengths and true dark skies required for chasing the Aurora Borealis. Southern coastal backdrops—such as the Reynisdrangar stacks or Jökulsárlón—face open ocean skies that minimize light pollution. When setting up for night captures, pair an ultra-wide, fast prime lens (14mm to 20mm, f/1.4 to f/2.8) with ISO 1600 to 3200 and exposure lengths between 3 and 8 seconds to prevent motion blur in active auroral curtains.
Safety Protocols and Access Realities at South Coast Iceland Photo Spots
Field photography in Iceland carries real physical risks. The southern maritime corridor experiences severe meteorological shifts driven by sub-polar oceanic weather systems.
Recognizing Sneaker Waves and Coastal Hazard Zones
Sneaker waves at Reynisfjara, Kirkjufjara, and the beaches surrounding Dyrhólaey claim equipment and lives. These waves are caused by oceanic wave trains constructive interference, where swells sync up to form a wave with vastly higher kinetic energy and reach.
Maintain a strict buffer zone from the wet sand line at all times. Wet sand indicates the reach of recent surges. rarely climb onto isolated basalt boulders or sea stacks near the waterline, as incoming wave surges can envelop them within seconds, cutting off your retreat path.
Environmental Compliance and Moss Protection
Iceland's sub-arctic woolly fringe moss (Racomitrium lanuginosum) grows at a rate of only a few millimeters per year on volcanic lava fields such as Eldhraun. Stepping onto this moss crushes its fragile rootless structure, leaving permanent ruts that take decades to heal and initiating severe wind erosion.
Do not step off designated gravel paths, timber boardwalks, or marked trail boundaries to set up a camera tripod. Keep your tripods on hard rock, gravel, or designated soil trails at all times.
Consulting Official Meteorological and Road Portals
South Iceland is prone to severe katabatic winds—dense, cold air rushing down from the ice caps through mountain passes at speeds exceeding 30–40 m/s (60–80 knots). These gusts can blow vehicle doors backward, shatter car windows with flying gravel, and easily topple heavy tripods.
Before leaving your lodging each morning, always check wind velocity patterns, maritime cloud cover, and precipitation data on the Icelandic Meteorological Office (Veðurstofa Íslands) portal. In addition, consult Vegagerðin (the Icelandic Road and Coastal Administration) for current road conditions and travel restrictions. The files carry season and access notes, not live conditions. Check vedur.is and road.is for current weather and road status.
Field Gear, Lens Selection, and Filter Setups for Wet Maritime Environments
Operating effectively along the South Coast requires a specialized equipment ecosystem engineered to withstand pervasive moisture, high-velocity sand abrasion, and rapid temperature changes.
Optical Filters for Waterfalls, Ice, and Dynamic Ocean Waves
Do not rely purely on digital post-processing along the South Coast; physical glass filters are mandatory for capturing accurate optical physics in the field:
- Circular Polarizer (CPL): Cuts surface glare on wet basalt, enhances rainbow saturation at waterfalls, and reveals deep blue clarity in glacial ice. Choose high-end filters with hydrophobic nano-coatings to repel water beads.
- 3-Stop (0.9) and 6-Stop (1.8) Neutral Density (ND) Filters: Crucial for dialing in precise shutter speeds between 1/4s and 2s at Diamond Beach and Skógafoss under bright daylight conditions.
- Filter Wrench / Step-Up Rings: Cold temperatures cause metal filter threads to bind. Carry brass step-up rings and lightweight filter removal tools in your kit.
Tripod Anchoring in Loose Basalt Sand and High Coastal Winds
Standard tripod deployment will fail in coastal Iceland. Black sand behaves as a fluid non-Newtonian suspension when hit by retreating wave wash, causing standard rubber tripod feet to sink several inches mid-exposure.
Swap out flat rubber feet for stainless steel spikes. Spikes penetrate the soft top layer and anchor firmly into the underlying gravel base. When setting up in sustained gale-force winds, keep tripod center columns fully collapsed. Rather than hanging a heavy camera bag from the center column hook (which can act as a sail and induce high-frequency oscillations in turbulent wind), use your own body to shield the camera setup from the prevailing wind direction.
Microfiber Cloth Rotation System
Waterfall mist and salt spray make lens cleaning a constant necessity. Wiping a front lens element with a damp cloth simply smears oil and mineral residues across the glass, causing heavy diffraction and softness.
Implement a four-stage microfiber rotation system:
- Store 4 to 6 large, premium microfiber cloths in individually labeled, water-tight ziplock bags (labeled 1 through 6).
- Use Cloth #1 strictly to blot heavy water droplets off the lens barrel and filter ring.
- Use Cloth #2 to gently dab the center of the optical glass.
- Once Cloth #1 and #2 reach moisture saturation, retire them into a "Used" dry bag and cycle in Cloth #3 and #4.
Structuring Your Shooting Itinerary and Offline Waypoint Logistics
Efficiently capturing the best places to photograph South Iceland requires a logical itinerary that minimizes wasted driving time and maximizes your presence on location during optimal lighting windows.
For an optimal balance of locations, consider structuring your travel around an established 5-day Iceland photography itinerary. This timeframe provides sufficient buffer days to adjust for passing coastal storm fronts.
| Location | Optimal Lighting Window | Focal Length Range | Key Technical Challenge |
|---|---|---|---|
| Seljalandsfoss & Gljúfrabúi | Sunset / Midnight Sun (Facing West) | 14mm – 24mm | Severe 360° spray behind the falls; extreme dynamic range |
| Skógafoss & Kvernufoss | Early Morning (Sunrise side-light) | 24mm – 70mm | Heavy mist cloud wiping out long-exposure detail |
| Dyrhólaey Promontory | Late Afternoon to Sunset | 16mm – 35mm & 100–400mm | High cliff wind shear; strict nesting season path closures |
| Reynisdrangar (Vík Beach) | Dawn / Early Morning Sunrise | 70mm – 200mm | Directional sunrise side-lighting; compressing scale of stacks |
| Fjaðrárgljúfur Canyon | Mid-morning or Late Afternoon | 24mm – 50mm | Navigating deep canyon shadow lines; strict trail boundaries |
| Jökulsárlón Glacier Lagoon | Blue Hour / Sunrise | 35mm – 85mm | Drifting ice movement requiring fast shutter speeds (>1/60s) |
| Breiðamerkursandur | Dawn / Low Golden Hour Light | 16mm – 35mm | Finding 1/4s–2s shutter balance for retreating wave motion |
Waypoint Navigation vs. Mapping Applications
When executing a South Coast photography route, understand how navigation assets function in remote areas. The KML, GPX and GeoJSON files live on your device, so the waypoints work with no signal. Downloading offline map tiles is a separate step inside your mapping app.
The files are waypoints. Your own mapping app — Gaia GPS, OsmAnd, Organic Maps, a Garmin — does the routing. If you use Gaia, follow our step-by-step tutorial on importing KML map files into Gaia GPS to ensure your layers and elevation profiles are cached locally before departing airport cellular coverage.
Frequently Asked Questions
What is the best time of day to photograph Reynisfjara and Dyrhólaey?
Dyrhólaey is best photographed during late afternoon and golden hour, when warm directional light illuminates the sweeping black sands of Kirkjufjara to the west and lights the volcanic sea arch. For Reynisfjara, dawn and early morning are ideal if you are shooting from Vík beach looking west toward the Reynisdrangar stacks. If shooting on Reynisfjara beach itself beneath the basalt columns, early morning minimizes tourist footprints in the sand, while late sunset provides rich rim lighting along the breaking surf.
How do I protect my camera gear from mist at South Coast waterfalls?
Equip your camera with a dedicated waterproof rain sleeve that cinches tightly around the front of your lens hood. Use a clear UV or protective filter treated with a hydrophobic coating as a sacrificial barrier for your front element. Implement a strict rotation of dry microfiber cloths stored in individual ziplock bags. Keep your camera pointed downward toward the ground between framing adjustments, and only remove your lens cap immediately before triggering the shutter.
Can I use drones at major South Coast Iceland photo spots?
Drone flight is strictly prohibited at many major South Coast tourist locations, including Seljalandsfoss, Skógafoss, Reynisfjara, Dyrhólaey Nature Reserve, and Fjaðrárgljúfur, while Vatnajökull National Park permits recreational flights only in specific designated areas and restricts them around sensitive zones like Jökulsárlón. These bans protect wildlife, prevent disturbance to visitors, and avoid air traffic hazards with search-and-rescue or sightseeing aircraft. often check for on-site signage and obey national park regulations.
How much time is recommended to photograph the South Coast?
The ideal duration depends heavily on seasonal daylight lengths, weather volatility, and the specific locations you intend to cover. Building flexibility into your schedule gives you buffer time to wait out coastal storm fronts, return to key viewpoints for secondary lighting windows, and explore locations like Diamond Beach across both dawn and dusk.
Download curated South Coast Iceland GPS waypoints to plan your exact shoot locations and load them directly into your favorite offline mapping app before your trip.